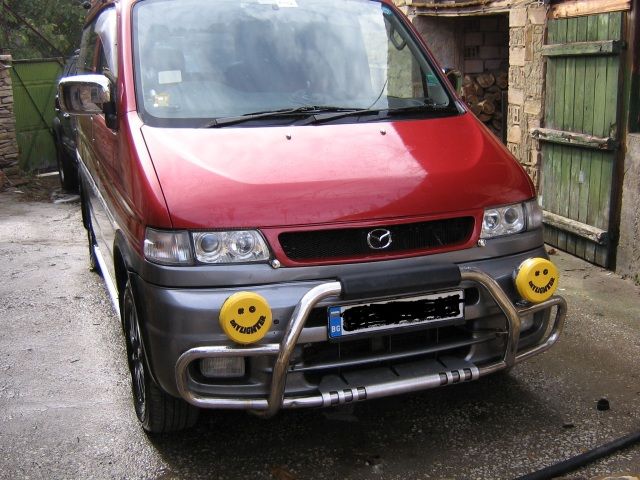
Grill options

All about modifications, shiny alloys, chrome wheel nuts & mirrors, body skirts and much more!

Moderator: Ian

Spencer54
Bongolier
Posts: 390
Joined: Sat Jun 29, 2013 7:52 pm

Grill options

Post by Spencer54 » Mon Jan 13, 2014 4:23 pm

Grill needs a revamp (Old Style)

Any top tips to spruce this up, do I need special plastic paint or can I get away with standard?

Does the badge come off?

Pics if you have them would be a bonus. :D
User avatar
helen&tony
Supreme Being
Posts: 9869
Joined: Thu Nov 18, 2004 12:49 pm
Location: Bulgaria

Re: Grill options

Post by helen&tony » Mon Jan 13, 2014 4:36 pm

Hi
It depends on how far you want to go!...This is mine, but the ends are considerably re-shaped for the headlights, so yours would be easier

Image

I can describe how to do it if you like
Cheers
Helen
In the beginning there was nothing , then God said "Let there be Light".....There was still nothing , but ,by crikey, you could see it better.
User avatar
jimmo62
Bongolier
Posts: 321
Joined: Sat Jan 11, 2014 6:54 pm
Location: Bristol

Re: Grill options

Post by jimmo62 » Mon Jan 13, 2014 5:27 pm

Sorry away from home at the moment so no photos...

I sprayed mine with Simoniz Acrylic car paint - Satin Black. It has come out really nicely, retaining the slight surface texture on the grillle but covering nicely. Before starting the grille was a muddy grey colour - I think it may originally have been chrome but that has long since gone!.

I degreased it thoroughly and masked off the whole badge with masking tape. Lots of thin coats of paint later it was looking pretty nice. I sprayed from the back first to get all the surfaces, then I did the front. I removed the masking on the badge and used a small paintbrush to fill in the middle of the badge (sprayed some paint into a small container to do this) which took just 2 coats.

I'm no expert in paint spraying but this is a straightforward job.

I think you can get the badge off but I'm not sure it's worth the bother unless you are after absolute perfection.....which on a 20 year old car didn't seem a problem.....
User avatar
mikeonb4c
Supreme Being
Posts: 22877
Joined: Sun Nov 05, 2006 10:49 pm
Location: Living with Mango Bongo in the North West but with a tendency to roam
Contact:

Re: Grill options

Post by mikeonb4c » Mon Jan 13, 2014 5:48 pm

jimmo62 wrote:Sorry away from home at the moment so no photos...

I sprayed mine with Simoniz Acrylic car paint - Satin Black. It has come out really nicely, retaining the slight surface texture on the grillle but covering nicely. Before starting the grille was a muddy grey colour - I think it may originally have been chrome but that has long since gone!.

I degreased it thoroughly and masked off the whole badge with masking tape. Lots of thin coats of paint later it was looking pretty nice. I sprayed from the back first to get all the surfaces, then I did the front. I removed the masking on the badge and used a small paintbrush to fill in the middle of the badge (sprayed some paint into a small container to do this) which took just 2 coats.

I'm no expert in paint spraying but this is a straightforward job.

I think you can get the badge off but I'm not sure it's worth the bother unless you are after absolute perfection.....which on a 20 year old car didn't seem a problem.....
I did likewise, though used a Swan & Morton modelling knife to mask only the chrome badge logo. Also, I used spray on plastic primer (after wet and dry sanding the grille) then a silver (cellulose car paint) that took my fancy. The car looked hugely improved once job done
User avatar
mellon man
Bongolier
Posts: 266
Joined: Wed Aug 28, 2013 7:49 pm
Location: Cwmbran S EAST WALES

Re: Grill options

Post by mellon man » Mon Jan 13, 2014 6:17 pm

My badge popped off easily - gave the grill a good wash in hot soapy water - then cleaned all over with Methylated spirit once it was fully dry - hung up with some string in my shed and sprayed first with 2 coats of standard (spray can) grey primer and then when dry sprayed with 2 coats of a standard type of satin black - Badge popped back on OK with no glue needed.

Still after a few months looks good on the van =D>

So easy to do thinking of a colour change :idea: will have to see what I've got lying around that goes with a green bongo any suggestions would be appreciated :?
Spencer54
Bongolier
Posts: 390
Joined: Sat Jun 29, 2013 7:52 pm

Re: Grill options

Post by Spencer54 » Mon Jan 13, 2014 6:18 pm

Yes please do tell, headlights are from an Astra?

Thanks everyone - all good tips :wink:
Gasy
Supreme Being
Posts: 2123
Joined: Thu Apr 11, 2013 5:49 pm
Location: Peterborough

Re: Grill options

Post by Gasy » Mon Jan 13, 2014 6:56 pm

There is a bloke on here who is getting into transfer dipping
Fancy a fancy grill he's your man to speak to
Think he's cabte
Gas safe heating engineer / plumber if you need any advice just shout.
User avatar
mikeonb4c
Supreme Being
Posts: 22877
Joined: Sun Nov 05, 2006 10:49 pm
Location: Living with Mango Bongo in the North West but with a tendency to roam
Contact:

Re: Grill options

Post by mikeonb4c » Mon Jan 13, 2014 8:30 pm

Gasy wrote:There is a bloke on here who is getting into transfer dipping
Fancy a fancy grill he's your man to speak to
Think he's cabte
Good tip. Whatever you do, do not spray car paint onto plastic grille without using plastic primer spray first, or you may get a crazing reaction with the plastic grille.
User avatar
helen&tony
Supreme Being
Posts: 9869
Joined: Thu Nov 18, 2004 12:49 pm
Location: Bulgaria

Re: Grill options

Post by helen&tony » Tue Jan 14, 2014 6:08 am

Hi
Yes....Astra quad headlights with angel eyes...I also now have DRLs recessed into the front panel, and indicators are hidden on top of the Astra lights...a 12 inch strip indicator.
Here's how to mod your grille:
Firstly, it'll take a couple of days, so I fixed some mesh where the grille was by bending the edges to add strength and rigidity, and fixed it with cable tidies, then you aren't in a hurry if you have adequate radiator protection.
First, clean up the rear of the grille, and de-grease the inside areas that you'll retain with thinners...don't use white spirit, as it can leave an oily trace.
Next, get a small tin of builder's spray foam, and fill the back of the grill in the areas you'll keep...namely everywhere but the centre which you'll remove....foaming takes a few seconds, but give it overnight to set!....After that few seconds of hard graft, it's pub time to rest and recuperate!
Next day, trim the foam flush with the back edges of the grille, and stipple a bit of glassfibre resin onto the foam, adding a bit of glass tissue or mat, and when tacky, add another layer of resin....Again...time for the pub, after today's hard half hour....(if you're not addicted to beer / cider before doing the grille, you soon will be... :lol: :lol: :lol: :lol: )
When the strengthening is hard and set, cut out the bars in the grille, and saw the top badge area flush....then file down the cut areas 'till they're smooth. THEN, rub down the whole area with abrasive paper to the plastic....and sit back and decide if you want to re-shape any areas at the edge. If you want to re-shape , and you're adding large areas of filler, I suggest adding a few small screws to act as posts to help the filler stick!....then fill with PLASTIC filler onto the bare plastic grille where you've cut .Let this set well, and only use plastic bumper filler...DON'T use P38 !!!! When you've filled and rubbed down, prime with PLASTIC primer, and let it dry. THEN use aerosol filler / primer....a few coats are good. Then you spray a dusty coat of any old colour you have in the garage, and when dry , you rub it all off....any hollow area will be visible , as the paint won't have rubbed off... Fill with 3M glazing putty from the body-shop, let it dry, rub and prime....When the whole lot's smooth, paint it!.
NOW cut the grill mesh to the shape of the back, and bond it onto the back of the grille with epoxy glue where you've foamed and glassed it.....don't go too near the top edge, as the cut edge of the mesh will shred your hands when opening the bonnet :lol: :lol: :lol: :lol: ....When it's done, I add a couple of flat-head screws, and fill the back and brush some paint on to neaten it!....
Job done....add a badge and go!!!!
Cheers
Helen
In the beginning there was nothing , then God said "Let there be Light".....There was still nothing , but ,by crikey, you could see it better.
User avatar
Muzorewa
Supreme Being
Posts: 5250
Joined: Wed Sep 19, 2007 6:00 pm
Location: Team Muz HQ, Outer Bongolia
Contact:

Re: Grill options

Post by Muzorewa » Tue Jan 14, 2014 8:40 am

When I saw the thread title I was hoping to see a George Foreman and some sizzling Spam Image
Image
User avatar
mikeonb4c
Supreme Being
Posts: 22877
Joined: Sun Nov 05, 2006 10:49 pm
Location: Living with Mango Bongo in the North West but with a tendency to roam
Contact:

Re: Grill options

Post by mikeonb4c » Tue Jan 14, 2014 9:29 am

Helen - did you not have any problem with thinners melting the plastic, ditto with fibreglass resin?
User avatar
helen&tony
Supreme Being
Posts: 9869
Joined: Thu Nov 18, 2004 12:49 pm
Location: Bulgaria

Re: Grill options

Post by helen&tony » Tue Jan 14, 2014 10:10 am

Hi
Muz...
You're not wrong!!!!....similar thoughts crossed my mind :lol: :lol: :lol: :lol: ....Can you use a small George Foreman grill on a lecky hookup????....I've never thought about it 'afore....we only everuse a barbi and a portable 2-burner when we camp!
Mike...
I never worry about melting the surface if i'm painting it....it helps key the surface a bit when the plastic's thick enough :lol: :lol: :lol: :lol: ...me being lazy 'n' all....but you have to be quick and not leave it on long.... :wink: ....It kind of reminds me of a job I had when I was at uni. I used to do car valeting for a friend, and I had a classic Consul Mk2 to clean....the plastic seats were so naffed, that I used thinners on them......BOY did they look good :lol: :lol: :lol: :lol: ....but I reckon I was as high as a kite for the next week with sitting inside for an hour with a thinners soaked rag!!!!....
Cheers
Helen
In the beginning there was nothing , then God said "Let there be Light".....There was still nothing , but ,by crikey, you could see it better.
User avatar
helen&tony
Supreme Being
Posts: 9869
Joined: Thu Nov 18, 2004 12:49 pm
Location: Bulgaria

Re: Grill options

Post by helen&tony » Tue Jan 14, 2014 10:17 am

Hi
Mike...
Ooops...sorry, I forgot about the resin....No, I didn't have a problem with that...I didn't touch the plastic so much with the resin, as it was merely covering and strengthening the foam surface, and it's always possible to fill and tidy when all's set....and the foam and 'glassing really strengthen the grille....I also glassed two metal brackets into the corners to take the 2 alloy buttons you see in the corner of the grille...I cut all the grille mounts off, and just left one at the top, so the grille's held on with 1 screw, and 2 alloy buttons....makes life a lot easier if you can get the grille out in moments!
Cheers
Helen
In the beginning there was nothing , then God said "Let there be Light".....There was still nothing , but ,by crikey, you could see it better.
User avatar
mikeonb4c
Supreme Being
Posts: 22877
Joined: Sun Nov 05, 2006 10:49 pm
Location: Living with Mango Bongo in the North West but with a tendency to roam
Contact:

Re: Grill options

Post by mikeonb4c » Wed Jan 15, 2014 9:33 am

Bigdaddycain gave me a bit of some stuff the professionals use for decreasing prior to painting. I'd track that down and use it, and keep thinners away from plastic. You might be fine, as Helen was, by wiping lightly and slightly, but it'll melt the surface and become a sticking place for rag fibres, with little provocation. Likewise, whilst epoxy resin is fine, don't let polyester resin near plastic, to be safe.
User avatar
ELZE
Supreme Being
Posts: 1305
Joined: Sat Feb 04, 2012 9:31 pm
Location: Whitley Bay

Re: Grill options

Post by ELZE » Wed Jan 15, 2014 9:38 am

helen&tony wrote:Hi
It depends on how far you want to go!...This is mine, but the ends are considerably re-shaped for the headlights, so yours would be easier

Image

I can describe how to do it if you like
Cheers
Helen

They look like Astra lights Helen ??? Nice but tricky to fit I reckon.
A Bongo is for life, not just for Christmas
Post Reply

Return to “Pimp My Bongo”