Page 1 of 3
DIY conversion... and so it begins.
Posted: Fri Nov 27, 2015 3:58 am
by BuddyBongo
Right Bongonauts, I've finally (finally, finally) started my full conversion on Buddy.
A few points to note at this early stage:
1> How did I miss (I assume someone's mentioned it on here) that the middle row of seats is so heavy?!?
2> Decent wood (Ply) is expensive in NZ
3> I don't know why I didn't do this before, it's starting to look great!
4> I went for a 'front' conversion... the kitchen area is right behind the cab.
5> Thank frig for the blinds... only 2 pairs of curtains to sew

Anyone got any solid advice, not mentioned before on this forum before I start sealing/screwing/nailing everything into it's final resting place?
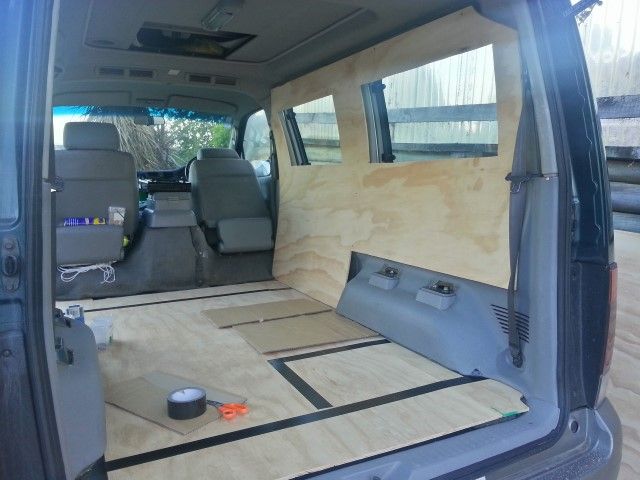
Here's an early shot of a pretty sad and empty looking Buddy, I'll continue to post photos here if anyone's interested

Re: DIY conversion... and so it begins.
Posted: Fri Nov 27, 2015 9:07 am
by Bob
Looks good.
Might pay you to cut an access trap above the fuel gauge sender just in case you need to access it.
Re: DIY conversion... and so it begins.
Posted: Fri Nov 27, 2015 9:14 am
by mikeonb4c
Bob wrote:Looks good.
Might pay you to cut an access trap above the fuel gauge sender just in case you need to access it.
Although I think a fix for poor earthing can be achieved by fixing a new earth wire from underside the car? Not as elegant but....
Conversion looking good there - keep sending pics and progress reports
Re: DIY conversion... and so it begins.
Posted: Fri Nov 27, 2015 10:44 am
by andyb36
as long as its an earth problem and not the sender
I have done mine from outside - wire to body and then to tank
bingo

Re: DIY conversion... and so it begins.
Posted: Fri Nov 27, 2015 12:44 pm
by BongoBongo123
andyb36 wrote:as long as its an earth problem and not the sender
I have done mine from outside - wire to body and then to tank
bingo
Also seems to be holding up here, great fix if it works.
Look forwards to seeing your progress photo's and reports Buddy Bongo

Re: DIY conversion... and so it begins.
Posted: Sun Nov 29, 2015 9:07 pm
by BuddyBongo
Bob wrote:Looks good.
Might pay you to cut an access trap above the fuel gauge sender just in case you need to access it.
Is it a common problem having to access the fuel gauge sender? I haven't cut an access trap... hope that doesn't bite me in the bum

More progress made over the weekend (see photos) ... the framing of the main seating area is almost complete... starting to take shape now...
I realised that no matter how big (or small) the image of the back area is in your head, its always way off!! I found cardboard (cut to the size of the table or the seating) very useful to help me get a sense of the size of things... also Duct tape on the floor marking out the spaces REALLY helped.
Around 50% of the wood I've used is recycled (mainly the framing) and some other bits I had lying around from other projects. I'm keen to keep with the recycled theme and as such I'm looking for a cool, stylish idea for the sink... I'm going to plumb it in to 2 x 25 litre water containers. I was watching an episode of Amazing Spaces a while ago and some guy had put his sink in a drawer so it was all neat and hidden away, it was cool, but I reckon it would be a real faff no? Will a washing up bowl with a hole cut it reeeeally be enough? All ideas/options considered.
Ta


Re: DIY conversion... and so it begins.
Posted: Sun Nov 29, 2015 11:42 pm
by mikeonb4c
Some say that they never really use the washing up bowl in their bongo conversions. If you're generally camping in warmer dryer weather then you might prefer washing up outdoors and using the space for something else. Something full width underneath the bed and that pulls out underneath the tailgate could be fun.
Re: DIY conversion... and so it begins.
Posted: Mon Nov 30, 2015 12:24 am
by philpdr
Very interesting,never seen framing right up the sides like that.Looking forward to further reports.
Re: DIY conversion... and so it begins.
Posted: Mon Nov 30, 2015 1:46 am
by BuddyBongo
mikeonb4c wrote:Some say that they never really use the washing up bowl in their bongo conversions. If you're generally camping in warmer dryer weather then you might prefer washing up outdoors and using the space for something else. Something full width underneath the bed and that pulls out underneath the tailgate could be fun.
Yeh I would have normally gone for something like that but... to get a 'self-containment certificate' (meaning we can free camp in most places in NZ) you need to have a sink that's 'plumbed in' and is contained within the van... we'll also have a collapsible bucket for when we're at a site but the idea is to get set up so we don't have to stay on sites very often or if we do, we will stay on the more basic Dept. of Conservations campsites....
Re: DIY conversion... and so it begins.
Posted: Mon Nov 30, 2015 1:52 am
by BuddyBongo
philpdr wrote:Very interesting,never seen framing right up the sides like that.Looking forward to further reports.
Yeh, fiddly but hopefully it will pay off....I was doing a bit of googling before this project and saw a few campers with 'wooden walls'... we're right into that look.... cosy, woody, warm colours... ANYTHING but grey! We plan on wrapping the internal raising roof in some different material too... less grey, happy us
I have to say it has been tricky getting it to fit around all the lumps and bumps of the insides of the van. I removed all handles from the insides to make it slightly more even.... screwed in some batons to help get some straight lines..... and it will mean covering up 2 of the window blind switches but as we're not switching over the power for them to the LB I don't see a problem... we'll just raise/lower them by hand as we always do!
Re: DIY conversion... and so it begins.
Posted: Mon Nov 30, 2015 2:22 am
by BuddyBongo
Just realised this is in the wrong topic... should be in 'Campervan Conversions in Bongos'.... anyone know how I can move it?? @Ian ???
Re: DIY conversion... and so it begins.
Posted: Mon Nov 30, 2015 9:37 am
by mikeonb4c
BuddyBongo wrote:philpdr wrote:Very interesting,never seen framing right up the sides like that.Looking forward to further reports.
Yeh, fiddly but hopefully it will pay off....I was doing a bit of googling before this project and saw a few campers with 'wooden walls'... we're right into that look.... cosy, woody, warm colours... ANYTHING but grey! We plan on wrapping the internal raising roof in some different material too... less grey, happy us
I have to say it has been tricky getting it to fit around all the lumps and bumps of the insides of the van. I removed all handles from the insides to make it slightly more even.... screwed in some batons to help get some straight lines..... and it will mean covering up 2 of the window blind switches but as we're not switching over the power for them to the LB I don't see a problem... we'll just raise/lower them by hand as we always do!
I rarely use the individual blind switches. Either I'm in the drivers seat and closing them using the master switches (to hide contents etc) or I'm in the back setting up the window screens and pulling the blinds down by hand.
I've kept my grey interior - matches our UK skies

Re: DIY conversion... and so it begins.
Posted: Mon Nov 30, 2015 8:31 pm
by BuddyBongo
mikeonb4c wrote:I've kept my grey interior - matches our UK skies
haha... it's not always sunny here you know! Especially Wellington.... it's known for it's wild weather..
Not sure why a couple of the photos aren't displaying anymore so here's the link to the album:
http://s1380.photobucket.com/user/buddy ... Conversion
Re: DIY conversion... and so it begins.
Posted: Mon Nov 30, 2015 11:20 pm
by BuddyBongo
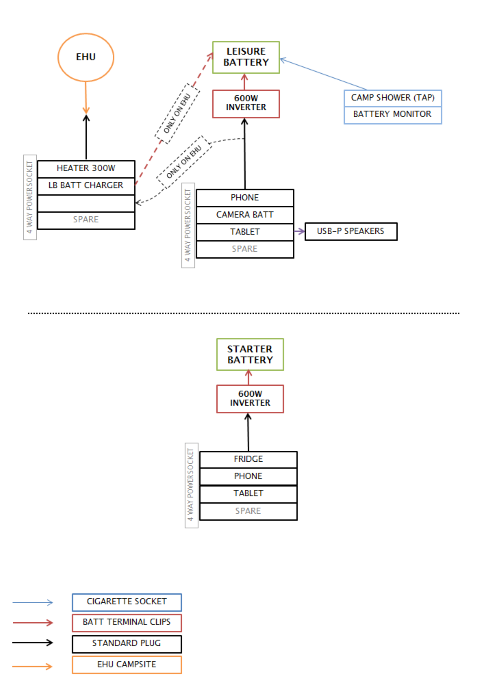
Here's my initial wiring diagram for how I want to set up the power in our van. It may look a bit over complicated but I don't want to do a split charge setup so having my leisure battery completely separate made sense to me... we'll only be 'off-grid' for a day or two so I'm hoping it will last. Then when we get to a site we'll use EHU to charge the leisure battery overnight....
The 'fridge' is just one of those little portable fridges you get from Halfords... it will only be on when driving which is fine because if we're staying anywhere longer we can pop our stuff in the campsite fridge/freezer.
Keen to get your opinions and thoughts on it...
Re: DIY conversion... and so it begins.
Posted: Mon Nov 30, 2015 11:24 pm
by philpdr
BuddyBongo wrote:philpdr wrote:Very interesting,never seen framing right up the sides like that.Looking forward to further reports.
Yeh, fiddly but hopefully it will pay off....I was doing a bit of googling before this project and saw a few campers with 'wooden walls'... we're right into that look.... cosy, woody, warm colours... ANYTHING but grey! We plan on wrapping the internal raising roof in some different material too... less grey, happy us
I have to say it has been tricky getting it to fit around all the lumps and bumps of the insides of the van. I removed all handles from the insides to make it slightly more even.... screwed in some batons to help get some straight lines..... and it will mean covering up 2 of the window blind switches but as we're not switching over the power for them to the LB I don't see a problem... we'll just raise/lower them by hand as we always do!
I've done a Sprinter and a couple of Transits in wood,always battened the sidewalls and used pine tongue and groove horizontally as it's easy to get curves right and any mistakes are easily sorted without too much waste.


