Page 2 of 3
Re: DIY conversion... and so it begins.
Posted: Mon Nov 30, 2015 11:42 pm
by philpdr
As to the weight of the middle row of seats it should be noted that if you weigh yourself on bathroom scales and then try and weigh yourself holding the seat and do the maths to find the weight of the seat,you can't see the reading on the scale and have(in absence of wife/girlfriend/partner/mate) to go and ask a neighbour for help,they will think you're mad.Not that that happened when a potential buyer of my seat wanted to know how much it weighed so he could arrange a courier to pick it up.
Re: DIY conversion... and so it begins.
Posted: Mon Nov 30, 2015 11:49 pm
by BuddyBongo
philpdr wrote:As to the weight of the middle row of seats it should be noted that if you weigh yourself on bathroom scales and then try and weigh yourself holding the seat and do the maths to find the weight of the seat,you can't see the reading on the scale and have(in absence of wife/girlfriend/partner/mate) to go and ask a neighbour for help,they will think you're mad.Not that that happened when a potential buyer of my seat wanted to know how much it weighed so he could arrange a courier to pick it up.
haha, of course not!

Coincidentally I have kept my bench seat and runners (for now) if anyone is interested........And in New Zealand........ Or wants to pay for XXXkg of seat to be delivered to the UK

Re: DIY conversion... and so it begins.
Posted: Mon Dec 14, 2015 11:11 am
by BuddyBongo
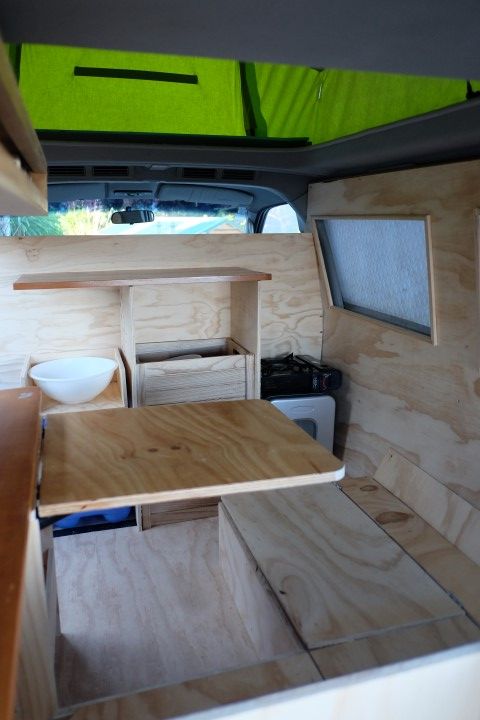
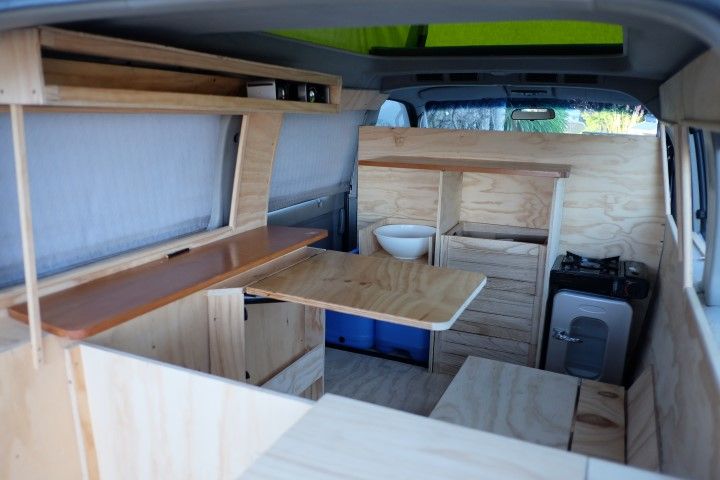
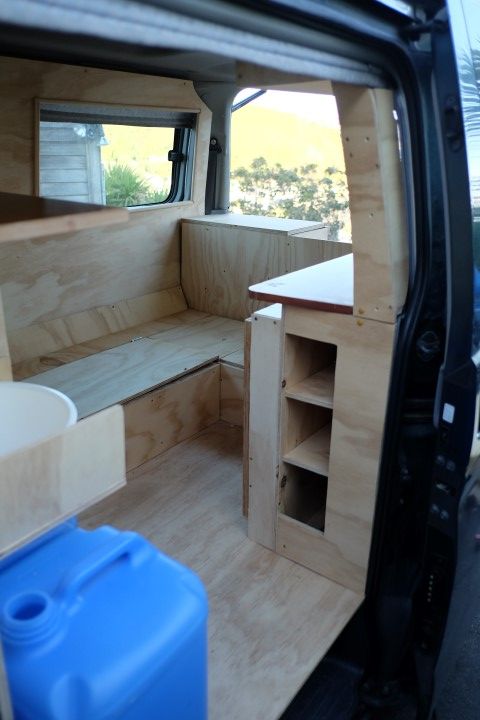
So a couple more weeks spent working on my DIY project.... finally getting around to building the Kitchen.... the bit I've been procrastinating about the most.....not quite finished yet. maybe one more week, then it's the Mrs turn to soft furnish it!!
here's a few pics and a link to the photo gallery
Full Gallery here =
http://s1380.photobucket.com/user/buddy ... Conversion
All feedback welcome

Re: DIY conversion... and so it begins.
Posted: Mon Dec 14, 2015 12:22 pm
by mikeonb4c
That is looking sooooo cool. Maybe you should keep the lovely woody look and varnish it and then use tie on cushions etc for comfort. Less hassle for the missus to make, nice and easy to clean upholstery and refurbish/wipe down woodwork, would look cool and sunny, and you could easily change the theme when you fancied. I love the way no old grey Bongo fabric/panels remain on view.
Re: DIY conversion... and so it begins.
Posted: Mon Dec 14, 2015 5:28 pm
by philpdr
Looking good!
Re: DIY conversion... and so it begins.
Posted: Mon Dec 14, 2015 5:59 pm
by Bob
Really neat, thanks for giving us pics.

Re: DIY conversion... and so it begins.
Posted: Mon Dec 14, 2015 9:30 pm
by BuddyBongo
mikeonb4c wrote:That is looking sooooo cool. Maybe you should keep the lovely woody look and varnish it and then use tie on cushions etc for comfort. Less hassle for the missus to make, nice and easy to clean upholstery and refurbish/wipe down woodwork, would look cool and sunny, and you could easily change the theme when you fancied. I love the way no old grey Bongo fabric/panels remain on view.
Ye thats pretty much the idea... but we're gonna use an oil on the timber..
But we'll soften it all up with nice coloured material on some squabs and put some pictures and curtains up.... along with some 'warm' lighting :
Re: DIY conversion... and so it begins.
Posted: Mon Dec 14, 2015 9:33 pm
by mikeonb4c
BuddyBongo wrote:mikeonb4c wrote:That is looking sooooo cool. Maybe you should keep the lovely woody look and varnish it and then use tie on cushions etc for comfort. Less hassle for the missus to make, nice and easy to clean upholstery and refurbish/wipe down woodwork, would look cool and sunny, and you could easily change the theme when you fancied. I love the way no old grey Bongo fabric/panels remain on view.
Ye thats pretty much the idea... but we're gonna use an oil on the timber..
But we'll soften it all up with nice coloured material on some squabs and put some pictures and curtains up.... along with some 'warm' lighting :
Oil is even better - just didn't like to suggest it in case it marked her indoors outfits.

Re: DIY conversion... and so it begins.
Posted: Mon Dec 14, 2015 10:03 pm
by BuddyBongo
mikeonb4c wrote:BuddyBongo wrote:mikeonb4c wrote:That is looking sooooo cool. Maybe you should keep the lovely woody look and varnish it and then use tie on cushions etc for comfort. Less hassle for the missus to make, nice and easy to clean upholstery and refurbish/wipe down woodwork, would look cool and sunny, and you could easily change the theme when you fancied. I love the way no old grey Bongo fabric/panels remain on view.
Ye thats pretty much the idea... but we're gonna use an oil on the timber..
But we'll soften it all up with nice coloured material on some squabs and put some pictures and curtains up.... along with some 'warm' lighting :
Oil is even better - just didn't like to suggest it in case it marked her indoors outfits.
What sort of oil do you suggest? would prefer low odour and low cost
Re: DIY conversion... and so it begins.
Posted: Mon Dec 14, 2015 11:36 pm
by mikeonb4c
Don't know - thought you did. I've used teak oil on a garden bench but always worried in case it marked clothes. My dislike of varnish, though it does the job well, is that it yellows with age and sunlight. I used Sadolin as an alternative and have been happy with that. It gives a satin finish and seems to penetrate more than polyurethane varnish. A lovely finish can be got with briwax but it's not waterproof and will watermark easily. I'd advise some Google research to see what people are doing out there.
Re: DIY conversion... and so it begins.
Posted: Tue Dec 15, 2015 12:07 pm
by helen&tony
Hi
I did a wood finish in a camper, in oak and mahogany veneer...I used Ronseal. It hardens up , and you can polish it.
Cheers
Helen
Re: DIY conversion... and so it begins.
Posted: Tue Dec 15, 2015 1:03 pm
by mikeonb4c
helen&tony wrote:Hi
I did a wood finish in a camper, in oak and mahogany veneer...I used Ronseal. It hardens up , and you can polish it.
Cheers
Helen
I think the Ronseal varnish approach has a lot to commend it in terms of durability, though slippery wet floors is one you really have to watch. It might be OK also on darker wood, but where you want to keep the natural look and light colour, it gets trickier. Watermarks on Briwax come out OK on reapplication of Briwax (which is very easy to apply and buff up) and maybe that could work on wall panelling where water and wear are not an issue (and Briwax would probably remove easily if it was found later that a more durable finish was needed). Sadolin is good if you want to imitate the satin effect of oiled wood. It will give a gloss finish if built up in a few coats, but just one coat and light sanding should leave it behaving more like a sealer/stain. The (admittedly teak/darkish stain) plywood unit I used it on in my Bongo seems the same colour as when first done.
For something as important as this job I think I'd google for pointers and I'd be patient and do some test pieces of ply with the various options before committing to one of them. It may be that a combination of finishing products is best (oiled flooring, Briwaxed wall panelling, varnished table surfaces, for example).Once you've impregnated the wood though, it's hard to undo things (oooh matron!) so you want to get it as right as possible first time.
P.S. Another interesting possibility might be a 'limed' finish, obtained by using a very thinned out paint of a suitable colour. This allows the wood and its grain to show through, but reduces the grain contrast plus can add a hint of colour if wanted. The 'limed' finish can also (optionally) be sealed in with (clear?) varnish/sadolin/Briwax and that would probably be a good idea wherever frequent rubbing/contact was likely, in order to avoid hard to remove grub marks getting into the wood. Again, test all this on some spare ply before committing!!!!
Re: DIY conversion... and so it begins.
Posted: Tue Dec 15, 2015 1:31 pm
by g8dhe
But don't leave it too long, otherwise you will get stains from cups and water splashes sooner than you think!
Re: DIY conversion... and so it begins.
Posted: Tue Dec 15, 2015 1:44 pm
by mikeonb4c
g8dhe wrote:But don't leave it too long, otherwise you will get stains from cups and water splashes sooner than you think!
Absolutely! Confucius he say: No finishee, no usee. In fact it will probably want a light sand even from ingrained dust and dirt if left any length of time!
No pressure
Re: DIY conversion... and so it begins.
Posted: Tue Dec 15, 2015 3:13 pm
by BongoBongo123
I would be wary of the oil/coating choice cause it is going to be horrible sleeping in a chemical soup. It looks really well done, you are obviously skilled as a wood worker.


