Bongo 4wd refurb *DO NOT DELETE*

Technical questions and answers about the Mazda Bongo

Moderators: Doone, westonwarrior

Post Reply
Bongolia
Supreme Being
Posts: 1524
Joined: Fri Apr 01, 2016 2:17 am
Location: Folkestone

Re: Bongo 4wd refurb

Post by Bongolia » Tue Nov 01, 2016 3:01 pm

Made a start on the rear cross member today but as the metal is heavier than our supplier stocks I have had to order it in . So I cut templates and moved on to the wheel arches.
I know its been said on here that the sprinter arches should have a fillet welded in but when I offered the replacement up it looks pretty much the same. :-s
https://goo.gl/photos/2QJRDpyfqWnWWSPY7
Am I missing something here?
:-k
User avatar
mikeonb4c
Supreme Being
Posts: 22877
Joined: Sun Nov 05, 2006 10:49 pm
Location: Living with Mango Bongo in the North West but with a tendency to roam
Contact:

Re: Bongo 4wd refurb

Post by mikeonb4c » Tue Nov 01, 2016 3:31 pm

Bongolia wrote:Made a start on the rear cross member today but as the metal is heavier than our supplier stocks I have had to order it in . So I cut templates and moved on to the wheel arches.
I know its been said on here that the sprinter arches should have a fillet welded in but when I offered the replacement up it looks pretty much the same. :-s
https://goo.gl/photos/2QJRDpyfqWnWWSPY7
Am I missing something here?
:-k
There are old threads on here that should explain the problem or you could pm Stuc who is familiar with this one as he's a bodywork man. Check once, check twice, check thrice before proceeding ;-)
User avatar
g8dhe
Supreme Being
Posts: 10643
Joined: Sun Apr 13, 2008 10:06 pm
Location: Worthing, West Sussex.

Re: Bongo 4wd refurb

Post by g8dhe » Tue Nov 01, 2016 4:00 pm

I've animated a before and after shot here, there not taken from identical positions so things behind the plane of the wheel hub will appear to move slightly;
Image
Geoff
2001 Aero V6, AFT, full side conversion.
teenmal
Supreme Being
Posts: 3656
Joined: Thu Mar 27, 2008 6:08 pm
Location: north lanarkshire

Re: Bongo 4wd refurb

Post by teenmal » Tue Nov 01, 2016 4:41 pm

To get a proper profile fit with the bumper you need to cut and add the fillet to the centre of the Arch, failing that the arch will overlap the bumper [-X :lol:

If you are Fast enough you will see that on Geoff pics.
Bongolia
Supreme Being
Posts: 1524
Joined: Fri Apr 01, 2016 2:17 am
Location: Folkestone

Re: Bongo 4wd refurb

Post by Bongolia » Sun Nov 06, 2016 9:12 pm

Thanks chaps got it now. What misled me a bit was that the rear X member had been cut out ready for repairs and this I think allowed the bumper to move forward a bit closing up the gap at the rear arch.It could have been a costly error so I am glad I posted pixs.


While I was waiting for the steel to arrive to carry out rear X members repairs I set about sealing weld repairs and getting the first coat of Schutz onto the new paneling.No vents yet Mike.

https://goo.gl/photos/MHj8oTMA2oNdPRD56

When I have completed the corrosion repairs the whole underside will get a second coat of underseal/schutz prior to waxing.
The schutz takes around 60 hours to thru cure and during that time it can shrink back a lot.
The floor pans will get a coat of Hammerite black once the sealer has cured.
Bongolia
Supreme Being
Posts: 1524
Joined: Fri Apr 01, 2016 2:17 am
Location: Folkestone

Re: Bongo 4wd refurb

Post by Bongolia » Sun Nov 06, 2016 11:19 pm

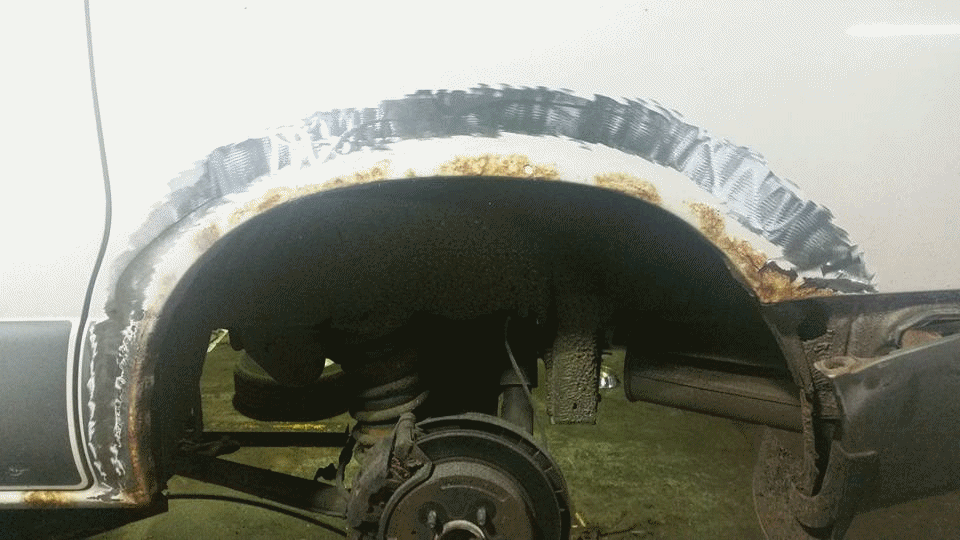
Steel arrived so I cut my teeth on the OS rear "ventilator panel just behind the rear arch.
I have left "tags" at the top and bottom of the repair as I may need a bit extra here when I come to replacing the arches.
This was a simple job here and uses 20 SWG steel with a bit of 18 SWG on the inner arch area.

https://goo.gl/photos/oZv5BjRTg3Dag54s7

There is still some work to to this area notably the corrosion that has gone through to a hole underneath the OS rear bumper bracket. This brackets quite a structure and not something that can be removed to gain access like the NS can. I will repair this one top down through an opening in the rear slam panel, the bit that holds the lock staple, and there is a small hole in the trumpet on this side too but nothing extensive unlike the NS.

The other side was not so straightforward
https://goo.gl/photos/ttG7LNCqgje6kvGZ7

So... dog rabbit...rabbit dog
First the cutting out.
You can see that the floor slam panel needed to be opened to get access to the inner box of the rear X member. The outer skin of the cross member is 18SWG and the inner reinforcing is 16 SWG. The inner reinforcement is a u channel that runs through to the trumpet beneath the D pillar and secures the rear bumper bracket also. The two horizontal ears or tags on the bumper bracket weld to the 18 SWG but the lowers spot weld through to the 16SWG forming a laminate That directly connects it to the chassis longeron.

https://goo.gl/photos/EA9BPazTEXHH7m6QA

These images are a bit confusing but as I cannot upload the images just the links you will have to stand on yer ed for a couple of them. They show the trumpet and rusted box sections that had to be removed.some are shot from underneath looking out to the NS and the others to the OS. The mucky treacle is Fertan.

https://goo.gl/photos/jhUUDGkQiWqeNV8M8

This is the area after it has been cleared and cleaned up. You can see the number of panels that converge in this area 7 in all.It makes for a very strong structure and it differs from the OS.
So having welded in a couple of skirting panels the cleared area was treated with Fertan and then zinced ready to start getting some strength back in the structure.
https://goo.gl/photos/xzcitkSUB6Dy4eJ67

The OE material that is formed into the semi conical panel is 16SWG.
I tried to replicate the shape. It was designed that way to take the substantial twisting that is going on in that corner, imagine a heavy top being thrown into a corner at speed on a narrow bus like ours and you can get an idea of the twisting and flexing that must be going on here. Anyway it was not a success and I went through three different approaches before I decided that the best solution would be to fabricate the piece in three curved sections and then reinforce the areas it joined the cross member at and strengthen the floor above also.
The spine was edge welded then three weld fillets were laid over this and the same repeated on the inside.The third section was a curved flat section edge welded to the top from the inside a inch tacked from under neath to form a flange that would be plug welded to the reinforcement of the floor above.

https://goo.gl/photos/cN69Xaw2Qujprbx98

The cross member inner sections were renewed and the chassis boxed off at the end where it will meet the new "cone". The cone was fitted and mig plug welded through the Inner support channel and welded around the outer underside also.

https://goo.gl/photos/JvobcUYThgMPK2c57

Area zinced and ready for sealer and schutz when I have fixed the vent panel. In one of the shots you will see the closing panel that forms the cover over the inner reinforcement. That will be plug welded after I finish the floor strengthening in that corner and then the iron can be fitted back and plug welded through all the panels before the slam panel is refitted.

https://goo.gl/photos/VKYbr1NRL4zuEqwGA

I hope that lot makes some sort of sense!
Bongolia
Supreme Being
Posts: 1524
Joined: Fri Apr 01, 2016 2:17 am
Location: Folkestone

Re: Bongo 4wd refurb

Post by Bongolia » Mon Nov 14, 2016 4:50 pm

Finalizing the NS rear cross member.
Not a good week last week . Lost a couple of days due to one thing or another so a Saturday input was needed to get things back on track.
In the last post I mentioned the closing panel and showed it in the last shot.
Here is a bit of detail about that. The panel will support the rear bumper iron.
Here are the two pieces they were MIG plugged and then the cross member was drilled to get penetration through all 3 pieces. The iron will be fitted and MIG plugged through all the lamination's later

https://goo.gl/photos/FtwMpATdT8bNcFuSA

Now the rear floor reinforcement is marked out and the floor trepanned so the MIG plugs will pass through the floor pan and onto the chassis rail flange. From underneath the cone flange will be plug welded to the plate. Two further plugs to the light panel and a couple to hold the edges down.
I am not sure where the swivel for the box will go yet so I will attach that when I get to the final fitting out stage.

https://goo.gl/photos/eEhMSB4cqBuVnyGq9

I had completely forgotten about the vent box flange so that had to be made up to give me something to hang the vent panel on. :oops:
Once this was done the slam panel was replaced and that area closed up. The slam panel material is very thin and it was difficult to get it welded without blowing holes everywhere. I had to stitch weld moving into the weld pool in order to stand any chance and in the end it worked out OK but I am not looking forward to the roof work.

https://goo.gl/photos/3y2MFcM3fsSBvbiWA

Finally bumper iron was mounted and after another Fertanning the area was etched and painted using 1K epoxy and the outer seam sealed.

https://goo.gl/photos/LdEE6EFSNNCk8BxT7
Anyone spot something missing here??
Bongolia
Supreme Being
Posts: 1524
Joined: Fri Apr 01, 2016 2:17 am
Location: Folkestone

Re: Bongo 4wd refurb

Post by Bongolia » Mon Nov 14, 2016 5:04 pm

OS cross member repair

I did show the OS vent panel repair in a previous post so I will not go there again.
On the OS side trumpet I had found a small whole and another under the bumper iron mounting. This iron is a big piece of kit so rather than drilling out the spots and removing it to get at the rot I used the same method used on the NS namely opening an access panel by removing the slam panel in that area.

This what I found in the cross member.
Same setup as the other side very nearly, an internal 16SWG panel. You can see a small exploratory drill hole in one of the shots. I had hoped that I may be able to open it out with a cone drill and weld in a heavy repair washer over and job done.

https://goo.gl/photos/hqC5pcXN6xrN37u57

Best laid plans etc...
The rust had taken a grip here and had corroded through both the heavy metal inner and the lighter outer panel.
Using a die grinder I cleared the area out to leave a flange in the outer panel so I could seam weld the new piece in from inside the box. It would have been almost impossible to weld from outside due to the bumper iron obstruction. One of the shots is taken from inside the box and you can see the inner trumpet at the end.
Fertan again and a shot of the patch offered up and zinced ready for welding. The patch was welded around the outer edge and the heaver inner was then welded to that.

https://goo.gl/photos/HZCrL7yjfUaG8q5f9

Over this a 16SWG plate was made up to bridge the repair and then plugged through to the outer repaired panel.
https://goo.gl/photos/fwEcard1G7LJMzyZ8

The repair was zinced and the slam panel welded back into place closing off the repair and then Fertaned.

https://goo.gl/photos/4oSe1eqfjeU3DxjU7

On to the small hole in the cone/trumpet.

The remainder of the panel was good it had just picked this bit to rust through from the inside.
You can see there are two panels very close to each other and there is no way that I can see that you could get wax in between these without drilling a couple of holes behind the bumper. I have put the positions of those in separate image. The positions would be the same for the NS.
Using the method of repair as the previously on the cross member, a small patch of 16SWG welded in position and then the peeled back portions were folded back and welded. The area treated and a larger 16 SWG patch laid over this seam and plug welded . Obviously Fertan and zinced.

https://goo.gl/photos/yvw9i6gASezLVD5D9
Bongolia
Supreme Being
Posts: 1524
Joined: Fri Apr 01, 2016 2:17 am
Location: Folkestone

Re: Bongo 4wd refurb

Post by Bongolia » Mon Nov 14, 2016 5:10 pm

Treating and painting the rear cross member and repairs.
Now I have completed the welding in this area I cleaned off the old sealants using a rotary wire brush and a blow torch, removed all the loose paintwork and exposed any surface rusted areas before cleaning the sections off with a stripper wheel.
Then treating the panels before finally schutzing. These images show that process at various stages.
Then finally schutzed with its first coat.

https://goo.gl/photos/sFgqigq7TpHLBwTY9

As there has been a lot going on in this area I will locally wax inject before moving on to the next stage.

N.B. A stripper wheel fits onto an angle grinder. It is made from abrasive impregnated nylon. It is flexible but more importantly it is not so abrasive as to remove metal in any large quantities.
They also last for ages and are not as prone to block as abrasive wheels. One thing worth mentioning if they are being used on a large exterior panel to strip back to metal. Be careful you do not over heat the panel as this could leave you with distortion. [-X
Bongolia
Supreme Being
Posts: 1524
Joined: Fri Apr 01, 2016 2:17 am
Location: Folkestone

Re: Bongo 4wd refurb

Post by Bongolia » Mon Nov 14, 2016 5:20 pm

Slam Panel and reinforcement.
Right so this is last bit for today.
These images show the slam panel being treated before painting with zinc and epoxy.
I will let this through cure for a couple of days before sealing as I will be blowing wax under the seams of the plates and slam panel underside welds. With the sealer in place I would not know if the wax had properly coated those bits.

https://goo.gl/photos/dzRV2PrUB2kcuuW99

The floor of the van will get two coats of black hammer finish as will the rear panel and vent panels.
Bongolia
Supreme Being
Posts: 1524
Joined: Fri Apr 01, 2016 2:17 am
Location: Folkestone

Re: Bongo 4wd refurb

Post by Bongolia » Mon Nov 14, 2016 5:28 pm

Talking of vent panels...
One for Mike.
https://goo.gl/photos/69C89BUP8rYLgzGf6

:wink:
Gasy
Supreme Being
Posts: 2123
Joined: Thu Apr 11, 2013 5:49 pm
Location: Peterborough

Re: Bongo 4wd refurb

Post by Gasy » Mon Nov 14, 2016 6:51 pm

Good job you doing there mate
Gas safe heating engineer / plumber if you need any advice just shout.
User avatar
mikeonb4c
Supreme Being
Posts: 22877
Joined: Sun Nov 05, 2006 10:49 pm
Location: Living with Mango Bongo in the North West but with a tendency to roam
Contact:

Re: Bongo 4wd refurb

Post by mikeonb4c » Mon Nov 14, 2016 8:12 pm

Fantastic job and i'm loving following this restoration. You can't help but wonder how much of this corrosion is lurking undiscovered in otherwise smart looking Bongos. This work might almost be worth trying out for a write up in a suitable classic car magazine - i spoke with 2gether insurance the other and they seemed to think some insurers were starting to recognise the Bongo as a classic, so there should be no room for snobbery by the car mags - "ok, which one of you editors wants to be the first to run an article on this soon to surface classic". Anyway, i reckon people will be forming a queue to have you restore their Bongos at this rate.

Couldn't make out vent holes in that last pic by the way - were there any?
Bongolia
Supreme Being
Posts: 1524
Joined: Fri Apr 01, 2016 2:17 am
Location: Folkestone

Re: Bongo 4wd refurb

Post by Bongolia » Mon Nov 14, 2016 8:22 pm

Gasy wrote:Good job you doing there mate
Cheers Gasy.
Mike, the holes have bungs in at the moment.
There is one 25mm hole under each vent cover, Can you make out what the cowls are?
This image may help.

https://goo.gl/photos/gdQDsmxqW3JXfjNe9
User avatar
mikeonb4c
Supreme Being
Posts: 22877
Joined: Sun Nov 05, 2006 10:49 pm
Location: Living with Mango Bongo in the North West but with a tendency to roam
Contact:

Re: Bongo 4wd refurb

Post by mikeonb4c » Mon Nov 14, 2016 8:27 pm

Bongolia wrote:
Gasy wrote:Good job you doing there mate
Cheers Gasy.
Mike, the holes have bungs in at the moment.
There is one 25mm hole under each vent cover, Can you make out what the cowls are?
This image may help.

https://goo.gl/photos/gdQDsmxqW3JXfjNe9
Ah, i can see much better now. I'm reasonably familiar with my bongo sills and their bung holes but still can't guess what the cowls are. :?
Post Reply

Return to “Techie Stuff”