


OK first post...
I have '99 tintop with lowline raising roof conversion - this type of raising roof seals along the vehicle gutter. I am fitting an Omnistor roll-out awning and have made special 'V shaped' stainless brackets that fit perfectly to the vehicle roof profile (drawings available if anyone's interested) with a 'sharp turn' at the gutter, thereby allowing raising roof movement and sealing without blocking the gutter. The two brackets will sit over pax doorpost & approx. 200mm forward of the rear gutter-end respectively. I was intending removing the internal linings etc to assess roof cavity before drilling & bolting the brackets in place, using internal penny washers and external silaflex. However, removing the lining looks a big job and I may have to disturb the roof conversion trims, bed board rails etc. I can obtain some aerospace spec blind rivets (stainless steel) and am thinking of 'drilling blind' from the outside, then just riveting the brackets in place again using silaflex.
Does anyone know if there are any electrical looms in the roof cavity, especially where I intend to drill?? Thanks!!
Chris
Seville, Spain
Awning brackets, drilling the roof
Moderator: Doone
Awning brackets, drilling the roof
4wd diesel, 1999 ex tintop with lowline raising roof
Keep a cool head, black ball game.
Keep a cool head, black ball game.
Re: Awning brackets, drilling the roof
Check out the online wiring manual - the area you are planning on drilling into carries half of the front-rear wiring.
You should be able to remove the door seal and pull the headlining away enough to get a look in above the sliding door

Re: Awning brackets, drilling the roof
Thanks very much Dave, back to plan A then. I'll just have to psych myself up and gain access behind the linings - believe me nothing is easy in 35Deg heat of summer down here. Will try update here by posting photos of the job plus end result in next week or so.
4wd diesel, 1999 ex tintop with lowline raising roof
Keep a cool head, black ball game.
Keep a cool head, black ball game.
-
Simon Jones
- Supreme Being
- Posts: 9341
- Joined: Mon Aug 29, 2005 3:34 pm
- Location: Salisbury (ish), Wiltshire
Re: Awning brackets, drilling the roof
Hi Chris, if only we had 35 degrees to contend with rather than continuous rain  . Have you considered using rivnuts instead? http://www.memfast.co.uk/shop/Vprod4.asp?cat=2250000415. These can be used in blind holes (although you would be wise to remove the headlining as there are a lot of strengtheners above the sliding door), but the main advantage is that you can unbolt the brackets from outside if required.
-
Northern Bongolow

- Supreme Being
- Posts: 7724
- Joined: Mon Mar 15, 2010 11:33 pm
- Location: AKA Vanessa
Re: Awning brackets, drilling the roof
if i remember right even if you remove the internal trims there are still box sections where you cannot see whats what.
Re: Awning brackets, drilling the roof
We can swop you 35" of summer rainbelieve me nothing is easy in 35Deg heat of summer down here
Allans Garage retired. Try PGS (Plymouth Garage Services) or Mayflower Auto Services Plymouth
Re: Awning brackets, drilling the roof
Thanks guys, I had a feeling it would be a partially closed area. Pushing and proding from outside does not appear to show any stiffer areas. If really, really necessary after gaining access, will cut small holes in any boxed areas and poke a ´scope inside, but hopefully any closed areas will not have looms inside.
Rivnuts are perfect for the job, but trying to source anything down here is problematic - am not keen at all on letting ANY local bodyshop drill the vehicle. Luckily, I´ve got access to blind rivets + tooling. Once fitted using silaflex these are permenant fixtures come what may.
No one said this would be easy, but when finished will have 2.0m high bongo with raising roof + awning - which fits in SOME carparks here giving me limited options. Anyone with AFT visiting Andalucia be warned, most city / supermarket public carparks 1.9m high, just a few at 2.1m no options. Would have been so much easier with a VW, but we just love this Bongo!!
Will post photos for prosperity / comments.
4wd diesel, 1999 ex tintop with lowline raising roof
Keep a cool head, black ball game.
Keep a cool head, black ball game.
-
helen&tony

- Supreme Being
- Posts: 9869
- Joined: Thu Nov 18, 2004 12:49 pm
- Location: Bulgaria
Re: Awning brackets, drilling the roof
Hi
If you need any rivnuts, I have an address who post to Europe...Believe me, a piece of string is the height of sophistication here...I even have to import cable for wiring the Bongo here, or use mains cable and label it
Cheers
Helen
If you need any rivnuts, I have an address who post to Europe...Believe me, a piece of string is the height of sophistication here...I even have to import cable for wiring the Bongo here, or use mains cable and label it
Cheers
Helen
In the beginning there was nothing , then God said "Let there be Light".....There was still nothing , but ,by crikey, you could see it better.
Re: Awning brackets, drilling the roof
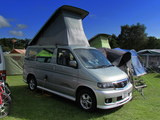
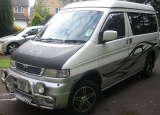
Job done - my aftermarket raising roof opens/closes and seals perfectly along gutter as before - awning looks great. 
In my rush to leave and drink cold beer, forgot to take photos of the Omnistor fully installed...will try update next week... but enclosed are some stage photos. Job took me about about 12hrs in total, but brackets are 3mm thick stainless steel and working with 74yr old Spanish father-in-law using all his equipment and my Spanish aint´t great. (He´s a boat owner, so has got everything needed for working with stainless.)
One issue - the Omnistor 2000 roll-out needs centre support (guess hence its so light, approx. 13Kg) - when pulling-out the awning found that single length of Awning rail mounted on front and rear bracket was not enough, although probably would have been OK with a secondary angle stiffener. Luckily, I´d made a third stainless steel centre bracket just in case and installed this one last exactly in-line with front & rear brackets. I then cut the Awning rail into three pieces so suit each bracket, in order to save some weight and stop any rattling at traffic lights.
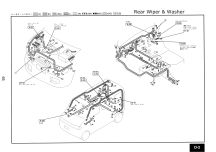
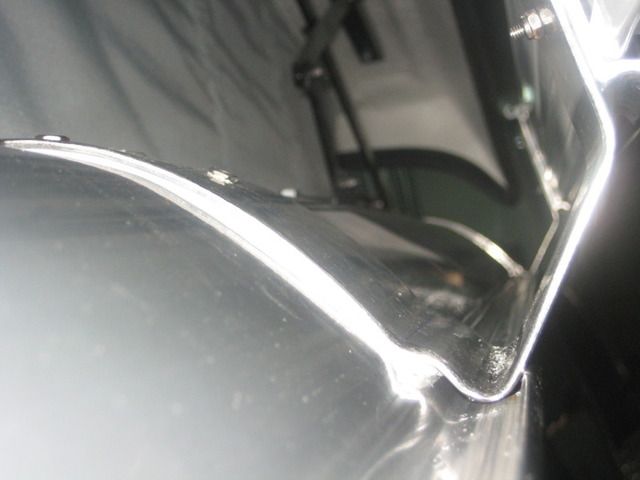
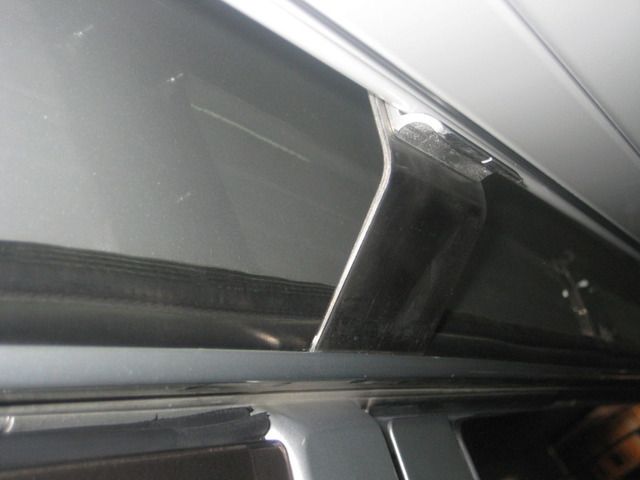
To answer my own question from original post, the curved area of vehicle roof is almost entirely closed - there is secondary inner skin structure running full length. This inner skin provides all clip points for electric harness & washer pipe, so no danger of damaging those. As expected, there are numerous crossmembers; one over the door post, one over the sliding door rear post etc, so good idea to remove the lining but would have got away without this.
Front bracket; inner roof crossmember looking up over the door post

Rear & Centre brackets, inner roof structure looking aft along & behind the lining:
(For orientation, the bright bar with Nylocs is the raising roof mounting and the two thick black items are mounting bosses for the internal pax handle directly over rear side window).


Front bracket clipped in place during drilling from outside:

Front bracket final installed on Silaflex using x5 stainless blind rivets:
I got four fasteners thru single skin (two forward inside the crossmember tophat section, two more just rear of the tophat) and even managed to get centre fastener thru double skin via the crossmember rear flange. This ain´t going anywhere!!

Five blind fasteners per bracket is overkill, but I could only get hold of 3/16" dia and not entirely sure what I´d be facing inside the roof, so scatter gun approach seemed fair and end result looks very good. I had to ´make room´ for some of the rivet tails prior to pulling them (15mm long down to bout 5mm when pulled), so advise if using Rivnuts these would need very careful positioning or clearing complete thru the secondary skin. In hindsight, the three uppermost fasteners are sufficient if brackets are really well-adjusted to suit roof profile of the tintop - Silaflex is great stuff. Using 2,5mm thick stainless for the brackets would also make things a bit easier, but ´esto es lo que hay´
Anyone else attempting this, don´t be put-off by garages & body shops umming n arring - it can be done. Finding suitable fabricator for the brackets is the hard part.
Well chuffed.
In my rush to leave and drink cold beer, forgot to take photos of the Omnistor fully installed...will try update next week... but enclosed are some stage photos. Job took me about about 12hrs in total, but brackets are 3mm thick stainless steel and working with 74yr old Spanish father-in-law using all his equipment and my Spanish aint´t great. (He´s a boat owner, so has got everything needed for working with stainless.)
One issue - the Omnistor 2000 roll-out needs centre support (guess hence its so light, approx. 13Kg) - when pulling-out the awning found that single length of Awning rail mounted on front and rear bracket was not enough, although probably would have been OK with a secondary angle stiffener. Luckily, I´d made a third stainless steel centre bracket just in case and installed this one last exactly in-line with front & rear brackets. I then cut the Awning rail into three pieces so suit each bracket, in order to save some weight and stop any rattling at traffic lights.
To answer my own question from original post, the curved area of vehicle roof is almost entirely closed - there is secondary inner skin structure running full length. This inner skin provides all clip points for electric harness & washer pipe, so no danger of damaging those. As expected, there are numerous crossmembers; one over the door post, one over the sliding door rear post etc, so good idea to remove the lining but would have got away without this.
Front bracket; inner roof crossmember looking up over the door post
Rear & Centre brackets, inner roof structure looking aft along & behind the lining:
(For orientation, the bright bar with Nylocs is the raising roof mounting and the two thick black items are mounting bosses for the internal pax handle directly over rear side window).
Front bracket clipped in place during drilling from outside:
Front bracket final installed on Silaflex using x5 stainless blind rivets:
I got four fasteners thru single skin (two forward inside the crossmember tophat section, two more just rear of the tophat) and even managed to get centre fastener thru double skin via the crossmember rear flange. This ain´t going anywhere!!
Five blind fasteners per bracket is overkill, but I could only get hold of 3/16" dia and not entirely sure what I´d be facing inside the roof, so scatter gun approach seemed fair and end result looks very good. I had to ´make room´ for some of the rivet tails prior to pulling them (15mm long down to bout 5mm when pulled), so advise if using Rivnuts these would need very careful positioning or clearing complete thru the secondary skin. In hindsight, the three uppermost fasteners are sufficient if brackets are really well-adjusted to suit roof profile of the tintop - Silaflex is great stuff. Using 2,5mm thick stainless for the brackets would also make things a bit easier, but ´esto es lo que hay´
Anyone else attempting this, don´t be put-off by garages & body shops umming n arring - it can be done. Finding suitable fabricator for the brackets is the hard part.
Well chuffed.
4wd diesel, 1999 ex tintop with lowline raising roof
Keep a cool head, black ball game.
Keep a cool head, black ball game.
Re: Awning brackets, drilling the roof
Photos of the finished job... 
Nice lines:-
http://i1255.photobucket.com/albums/hh6 ... _20003.jpg
Roof down, awning brackets x3 along gutter:-
http://i1255.photobucket.com/albums/hh6 ... _20006.jpg
http://i1255.photobucket.com/albums/hh6 ... _20008.jpg
http://i1255.photobucket.com/albums/hh6 ... _20004.jpg
Gutter still clear:-
Roof up, awning out:-
http://i1255.photobucket.com/albums/hh6 ... _20014.jpg
4wd diesel, 1999 ex tintop with lowline raising roof
Keep a cool head, black ball game.
Keep a cool head, black ball game.
-
Simon Jones
- Supreme Being
- Posts: 9341
- Joined: Mon Aug 29, 2005 3:34 pm
- Location: Salisbury (ish), Wiltshire
Re: Awning brackets, drilling the roof
Looks excellent! How did you manage to park your Bongo in the living room? . I'm interested your spare wheel mounting arrangements. Do you have any more photos please?
Re: Awning brackets, drilling the roof
Hi Simon,
Thanks, its the father-in-laws garage under his house (larger space than my house).
Basically, installed a water tank, so need to find somwhere to mount the spacesaver. First, installed puncturesafe all round (no problems), but you can't beat having a spare so moved onto finding a mounting. Discounted the bonnet for looks and fuel economy. Mounting to tailgate via ladder was going to be expensive and difficult. Also needed more storage space for long trips so...
Adapted a bak-rak G4, by welding brackets underneath to mount the spacesaver spare wheel. This is used mostly in the up position and only takes a few seconds to drop to allow tailgate access.
We also use the rack to carry a large but cheap plastic box for longer trips, bit of a faff to remove and access the tailgate (about 5mins), but currently working on a quick removal system which is basically going to be a marine plywood base with castors. This base will be attached to the rack with standard bak-rak cross brackets; should only take a minute to remove when finished.
The lightbars on quick release brackets, so can be turned easily and used with rack either up or down.
When rack is down and fully loaded the space saver clears sleeping policeman etc, but it does require some thought on ramps etc. I definitely considering spring assistors with a fully loaded van & box, but had no problems so far.
I am going away on holidays soon, but will try post some more photos of the rak down & box towards end of August.
4wd diesel, 1999 ex tintop with lowline raising roof
Keep a cool head, black ball game.
Keep a cool head, black ball game.
-
beer_monsta
- Bongonaut
- Posts: 50
- Joined: Sun Sep 30, 2012 7:56 pm
- Location: Brampton, Cambs
- Contact:
Re: Awning brackets, drilling the roof
Hi gilly99
Have you still got a copy of the drawings for your bracket? I've just aquired a omnister 5002 and want to fix it to my bongo. Yours looks like the sort of fixing i'd like to try on mine.
Cheers in advance
Have you still got a copy of the drawings for your bracket? I've just aquired a omnister 5002 and want to fix it to my bongo. Yours looks like the sort of fixing i'd like to try on mine.
Cheers in advance