I put the glow plugs in, temperature sensors in, the inlet and exhaust studs in, oil fill pipe and water pipe on the drivers side on the bench (dinning room table actually very understanding wife
Out to the car now…
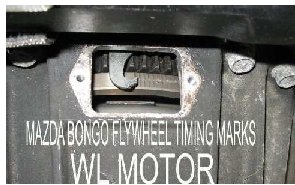
Set No. 1 piston at dead top centre. Check fuel pump mark was lined up with timing mark.
Fitted head gasket in place.
Applied silicone as manual to water pump end of head.
Lower head on with the timing mark on the belt pulley set.
Greased/oiled all the head bolts threads and under the bolt head flange.
Tightened bolts hand tight and then four times to torque settings 22 ft/lbf (Bongo manual says 4 times, Ford ranger says 3)
Then put a paint mark on all the bolt heads and turned in sequence 90º
Then once more to a further 90º turn.
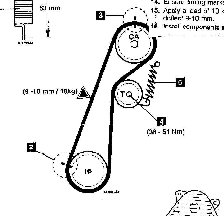
I think I then fitted new cam belt and new tensioner, re-checked timing marks.
I then re-fit exhaust gasket and manifold.
First poured oil over the cam and re-fitted the rocker cover to the manual including silicon sealant and new gasket.
Fitted all the hoses etc and alternator basically everything on this side of the engine.
Now to the other side of the engine…
Fitted injectors.
Buzz bar for the glow plugs.
Then the inlet manifold and new gasket. Don’t forget to re-fit the plate that holds electrical bumf and vacuum pipes the plate is held with two of the manifold bolts. (not that I forgot
EGR was the re-fitted with two home made blanking plates (galvanized steel plate just a bit thicker than the old gaskets)
Re-fitted the vacuum pipes.
Re-fitted the fuel return and injector pipes. Be careful as I managed to snap the rubber fuel return pipe, as it was very brittle. Replacement found and fitted.
Fitted the air intake pipe that runs behind the engine and re-connected it to the turbo and air filter.
Re-checked the timing and then re-fitted the cover.
Connected all the water pipes and flushed engine out with hosepipe and then fitted new thermostat. Refilled coolant system with water.
Checked oil levels
Fitted the centre cover with hand brake, gear stick and any other electrical plugs and bits I could see
Stood back and went for restart bugger battery not charged enough as it had been stood for a while.
Charged battery and went for blast off I think it was about six turns of the key and hey presto the engine sprang into life. One very happy and satisfied Maxheadroom.
I had two nuts left over and thought ah that was the two I replaced holding the air pipe to engine as I couldn’t find them in the first place.
I just took my time and if in doubt log on here or lush projects etc.
I hope this is of help…..
any questions please do not hesitate to contact mikeonb4c