Window bolt respray.. 11 down, 1 to go...?

Technical questions and answers about the Mazda Bongo

Moderators: Doone, westonwarrior

Locked
jaylee
Supreme Being
Posts: 5500
Joined: Wed Mar 05, 2008 4:56 pm
Location: AQVAE SVLIS

Window bolt respray.. 11 down, 1 to go...?

Post by jaylee » Thu Oct 16, 2008 7:27 pm

Hi, how does one remove the plastic fake catch cover to access the bolt on the rear left hand side passenger window without breaking it?? (The one that don't open.)

I seriously can't work out how to crack this one open...

Been methodically tidying up the worn out paint work on the window bolts & wiper arms..! 8)

Cheers!
Cheaper by comparison to a race horse...
Image
User avatar
missfixit70
Supreme Being
Posts: 12431
Joined: Fri Jun 01, 2007 3:53 pm
Location: weymouth

Re: Window bolt respray.. 11 down, 1 to go...?

Post by missfixit70 » Thu Oct 16, 2008 7:42 pm

I though it came off the same as the rest? you may need an extra pair of hands to pull back the trim to get at it if I remember right :-k
You can't polish a turd - but you can roll it in glitter.
jaylee
Supreme Being
Posts: 5500
Joined: Wed Mar 05, 2008 4:56 pm
Location: AQVAE SVLIS

Re: Window bolt respray.. 11 down, 1 to go...?

Post by jaylee » Thu Oct 16, 2008 9:00 pm

This puppy don't look like any of the rest, it's got what looks like spindles like the catches have but it don't move..
I would have thought it would have been the same affair as the two hinges at the other side of the window..?

Been doing em four at a time, one off each window.. :wink:
Been like a contortionist in order not to lose bits, It's easier with an extra pair of hands..
Lucky Sandy came back at the right time to help fit the three catch bolts.. :D

Cheers Kirsty, will look at it with fresh eyes next chance i get to finish the job. :roll:
Cheaper by comparison to a race horse...
Image
User avatar
mikeonb4c
Supreme Being
Posts: 22877
Joined: Sun Nov 05, 2006 10:49 pm
Location: Living with Mango Bongo in the North West but with a tendency to roam
Contact:

Re: Window bolt respray.. 11 down, 1 to go...?

Post by mikeonb4c » Thu Oct 16, 2008 9:48 pm

Could you not cheat on this one and mask off tight around it then paint it in place e.g. put masking tape over and round it, cut out round it with a sharp modelling knife and remove the tape covering it, then push the masking tape in against the circumference of the button to be painted using a sharp screwdriver blade or similar.

I used a technique like that on my Mazda radiator grille badge when I need to respray it and didn't fancy removing the badge. I got a pretty good result. I any paint did get on the glass, a sharp modelling knife blade (Swan Morton - pointed blade) is effective for scraping it off with accuracy.

But then I've got me old modelling tools I can use (and do, frequently - smug :lol: )
jaylee
Supreme Being
Posts: 5500
Joined: Wed Mar 05, 2008 4:56 pm
Location: AQVAE SVLIS

Re: Window bolt respray.. 11 down, 1 to go...?

Post by jaylee » Thu Oct 16, 2008 11:03 pm

Mmmm, :-k was tempted... I already stripped the paint of the alloy bolts by putting in the chuck of a cordless drill & slow turning over some wet & dry...
Trouble is they are sat on a rubber grommet which would look untidy with any inevitable overspill.

Quite pleased with the result so far, i don't normally trust myself with a spray can. :lol:
Cheaper by comparison to a race horse...
Image
User avatar
mikeonb4c
Supreme Being
Posts: 22877
Joined: Sun Nov 05, 2006 10:49 pm
Location: Living with Mango Bongo in the North West but with a tendency to roam
Contact:

Re: Window bolt respray.. 11 down, 1 to go...?

Post by mikeonb4c » Thu Oct 16, 2008 11:06 pm

jaylee wrote:Mmmm, :-k was tempted... I already stripped the paint of the alloy bolts by putting in the chuck of a cordless drill & slow turning over some wet & dry...
Trouble is they are sat on a rubber grommet which would look untidy with any inevitable overspill.

Quite pleased with the result so far, i don't normally trust myself with a spray can. :lol:
Ought to do mine. All out of time and enthusiasm (not to mention weather) at present though.

Might tackle that window switch though at the comfort of my desk, with the bits you sent me. And my modelling tools of course - ha ha!
jaylee
Supreme Being
Posts: 5500
Joined: Wed Mar 05, 2008 4:56 pm
Location: AQVAE SVLIS

Re: Window bolt respray.. 11 down, 1 to go...?

Post by jaylee » Fri Oct 17, 2008 12:08 am

mikeonb4c wrote:
jaylee wrote:Mmmm, :-k was tempted... I already stripped the paint of the alloy bolts by putting in the chuck of a cordless drill & slow turning over some wet & dry...
Trouble is they are sat on a rubber grommet which would look untidy with any inevitable overspill.

Quite pleased with the result so far, i don't normally trust myself with a spray can. :lol:
Ought to do mine. All out of time and enthusiasm (not to mention weather) at present though.

Might tackle that window switch though at the comfort of my desk, with the bits you sent me. And my modelling tools of course - ha ha!
You will have that switch air born pretty soon then..? :wink:
Talking of which.. I still have the guts of it that did a realistic impression of the Hindenburg if you're any good with PCB's? :lol:
Cheaper by comparison to a race horse...
Image
User avatar
mikeonb4c
Supreme Being
Posts: 22877
Joined: Sun Nov 05, 2006 10:49 pm
Location: Living with Mango Bongo in the North West but with a tendency to roam
Contact:

Re: Window bolt respray.. 11 down, 1 to go...?

Post by mikeonb4c » Fri Oct 17, 2008 6:31 pm

jaylee wrote:
mikeonb4c wrote:
jaylee wrote:Mmmm, :-k was tempted... I already stripped the paint of the alloy bolts by putting in the chuck of a cordless drill & slow turning over some wet & dry...
Trouble is they are sat on a rubber grommet which would look untidy with any inevitable overspill.

Quite pleased with the result so far, i don't normally trust myself with a spray can. :lol:
Ought to do mine. All out of time and enthusiasm (not to mention weather) at present though.

Might tackle that window switch though at the comfort of my desk, with the bits you sent me. And my modelling tools of course - ha ha!
You will have that switch air born pretty soon then..? :wink:
Talking of which.. I still have the guts of it that did a realistic impression of the Hindenburg if you're any good with PCB's? :lol:
Ooooooh No. I don't mind trying to squeeze a pair of small balls into a rocker using me modelling tool while sat at me desk, but I ain't takin' any of that recreational drug stuff - ha ha! 8)
technophobe
Tribal Elder
Posts: 637
Joined: Mon Feb 25, 2008 7:42 pm
Location: Pork Pie Land, Leicestershire

Re: Window bolt respray.. 11 down, 1 to go...?

Post by technophobe » Fri Oct 17, 2008 7:14 pm

Think the cover is a snap-thump on thingy. Doubt you'll get it off (leaver it off) without breaking it - but if you do and it breaks the breakers should have a spare. Not very helpful. :(
Richard & Jo

1995 SGL5 Black over silver clear windows
User avatar
mikeonb4c
Supreme Being
Posts: 22877
Joined: Sun Nov 05, 2006 10:49 pm
Location: Living with Mango Bongo in the North West but with a tendency to roam
Contact:

Re: Window bolt respray.. 11 down, 1 to go...?

Post by mikeonb4c » Fri Oct 17, 2008 9:11 pm

technophobe wrote:Think the cover is a snap-thump on thingy. Doubt you'll get it off (leaver it off) without breaking it - but if you do and it breaks the breakers should have a spare. Not very helpful. :(
I managed to get quite a long way dismantling one so I could clean the contacts. Re-assembled it and it works a treat again. Removing some of the bits needed two watchmakers screwdrivers so the 'spring on' sides, on switches, contact covers etc. could both be held off the lugs at the same time and the item removed. Easier to demonstrate than put in words!

Tell you what chums, we've wandered way off thread from window bolts - woops! :lol:
jaylee
Supreme Being
Posts: 5500
Joined: Wed Mar 05, 2008 4:56 pm
Location: AQVAE SVLIS

Re: Window bolt respray.. 11 down, 1 to go...?

Post by jaylee » Fri Oct 17, 2008 11:45 pm

Well back to the final bolt.. I sussed how to get at it..
Thanks fer all yer help!

Pull the trim back as Kirsty said, undo the two bolts underneath (being careful not to loose them behind the trim!
Lucky they had some goo on the heads (bit like the stuff in the door seals behind the door card) so you can withdraw once unscrewed.

Flip the hinged cover out from behind the trim & the bolt screw is revealed on the static window...
Image
technophobe wrote:Think the cover is a snap-thump on thingy. Doubt you'll get it off (leaver it off) without breaking it - but if you do and it breaks the breakers should have a spare. Not very helpful. :(
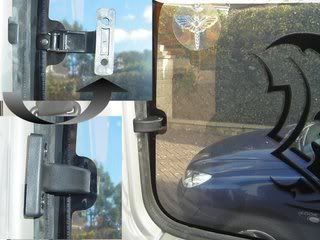
Yeah, your talking about the hinge covers.. i think?
When they come off the do appear to not sit right when refitted (even the one i thought was broke & loose anyway) & they do look like they're broke when removed in some cases..
I did find a knack of getting them to stay put by making sure they snap to the hidden part of the hinge (under the trim) first before i snap back over the bolt screw. :wink:
They are not as fragile as i thought they were, but they do refit..

Needless to say all the window bolts are done, i won't bore you with pics regarding the subtle bling.. Is it classed as bling?? :-k
The faded flaky paint is gone! :P

Now, getting back on topic about the window switch Mike. :lol: :lol:
I found reassembling the switch was a case of putting the the white passenger isolator box half in drop the spring in the recess hole, balance the ball bearing on top, push the bearing & spring down & click the white box down (in the on position). Line it all up & refit the switch lever box that houses the PCB...
Once screwed in push the rocker switch to the on position & it clicks & snaps into the lug at the top of the contact box... Done!
Cheaper by comparison to a race horse...
Image
User avatar
mikeonb4c
Supreme Being
Posts: 22877
Joined: Sun Nov 05, 2006 10:49 pm
Location: Living with Mango Bongo in the North West but with a tendency to roam
Contact:

Re: Window bolt respray.. 11 down, 1 to go...?

Post by mikeonb4c » Sat Oct 18, 2008 11:38 am

jaylee wrote: Now, getting back on topic about the window switch Mike. :lol: :lol:
I found reassembling the switch was a case of putting the the white passenger isolator box half in drop the spring in the recess hole, balance the ball bearing on top, push the bearing & spring down & click the white box down (in the on position). Line it all up & refit the switch lever box that houses the PCB...
Once screwed in push the rocker switch to the on position & it clicks & snaps into the lug at the top of the contact box... Done!
Hah! How funny. I took one look at that option and thought 'no way' so opted to lever off the black plastic rocker switch cover,which made the job v easy once I'd sussed how to remove the rocker switch cover
Locked

Return to “Techie Stuff”