low coolant detector

Technical questions and answers about the Mazda Bongo

Moderators: Doone, westonwarrior

harpo42

low coolant detector

Post by harpo42 » Sun Jul 15, 2007 7:37 pm

Well I fitted mine yesterday. for anyone interested these are my thaughts on the kit.

When I first looked at the kit I must admit it seemed very expensive for the amount of parts. However if this saves the engine then its fairly cheap. When we bought Mango 3yrs ago we intended to keep it for 10 yrs plus so i guess a broken hose is going to happen at some time during our ownership and its a certanty that we will not open the bonnet and check the water level each time we drive, so I have to view it as an insurance.

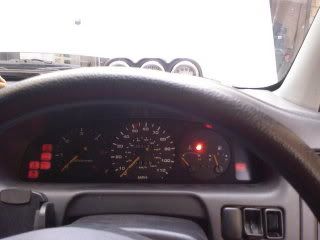
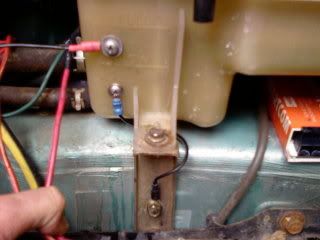
Very easy to fit took about two hours. I wanted to fit it so that it was live on the ingition not as suggestd on the acc switch. I also routed the sender wire through the grommet on the passenger side so that the wire ran inside the car not under the bonnet. Additionaly i wanted to fit the led in the dashboard.

The kit is very well presented and the instructions are very good. Only suggestion that i would make if your reading Haydn is that there is Black/Red and Red wires comeing from the unit but the instructions dont SPECIFICALLY say which is live and earth. (OK I know its obvious but perhaps it could be worth mentioning :roll: )

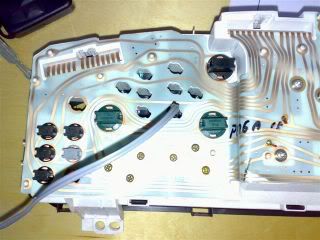
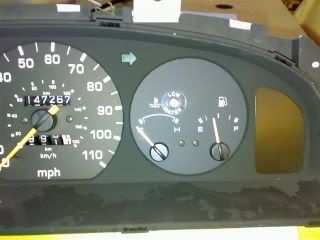
I fitted the led in the dashboard which is easy to do as there is a convient hole in the back of the instrument cluster. I did not push the led all the way home so that it can be pulled out when the instruments are taken out. Again as a suggestion perhaps a small plug and socket on the led lead would mean that if anyone else wanted to do this then you could unplug the led when removing the cluster.

Finally i found a convient earth point just below the tank rather than earthing to the battery.

All works great. Thanks very much to Haydn for getting this together. :D

http://i208.photobucket.com/albums/bb11 ... 99_000.jpg
http://i208.photobucket.com/albums/bb11 ... 98_000.jpg
Last edited by harpo42 on Mon Jul 16, 2007 6:00 am, edited 5 times in total.
clogger
Bongolier
Posts: 396
Joined: Tue Jan 30, 2007 8:22 pm
Location: bradford, west ridings of yorkshire

Post by clogger » Sun Jul 15, 2007 8:44 pm

thats a good location to put the led
as it`s the first place i would be looking if the light would come on

gonna put mine on me garage door first so it can tell me when i`ve got a low level in me garage :x :x
ECKY THUMP
the one true art form
francophile1947
Supreme Being
Posts: 11354
Joined: Mon Dec 18, 2006 6:15 pm
Location: Norwich

Post by francophile1947 » Sun Jul 15, 2007 8:51 pm

Thanks for that Harpo - I've yet to fix mine.
Can you edit your photos to the correct size? - they're far too big and make your text impossible to read without scrolling across the screen.
John
(Evidence that intelligent life exists in the universe, is that it hasn't tried to contact us)
Bonza

Post by Bonza » Sun Jul 15, 2007 9:08 pm

Nice one Harpo.
Haydns away at the mo.
Haydn extensively developed this from the original Engine Saver kit. After abandoning the original kit, cutting up perfectly good hoses and expansion tanks etc a model was perfected that worked every time. It wasnt easy esp doing it all by email with Oz what with the time difference and all. I know that the Owner in Oz said that this was not going to cover his costs but he got bitten by the Bongo thing.

After those two were happy I volunteered to fit the preproduction version, make suggestions, trial it, look for problems, make suggestions etc and do the write up

Few points here-. As you've discovered it can be wired up any way you want within reason. Try writing that up.

1. The way you have it wired it is permanently live. But you know that. If you put a fuse inline that should protect things.

2. Finding a good earth was notoriously difficult. Earth points were looked at but due to poor continuity throughout an old Bongo the battery negative was chosen to ensure consistent results. The system relies on a good earth return across the sensor screws. You may get spurious or poor warnings the way you have done it. The kit contains enough wire to take the earth (negative) lower sensor wire all the way across the vehicle to attach to the main battery or to the leisure battery if fitted. Thats what the designer intended.
Experimenting with the original EngineSaver kit using the top hose was very difficult due to trying to find a good reliable earth point.

3. I really like your LED fit position. As you area whizz at getting the speedo panel out it was obviously easy for you. The instructions were written for the more timid among us. Maybe thats why it took you 2 hours. I reckon easily less than an hour.

4. Take your point about which wire was live and which wasn't BUT as you say its obvious. It was difficult to tie in a module made in Oz and a kit made up in in the UK using differing wire colours etc. It was done this way to keep the dreaded Customs from taking a large chunk of the cost in VAT and duty and Royal Mail charge to collect it all, as I learnt to my cost!.
The bullet connectors are the secret as they cant go any other way round (I think). Careful study of the instructions helps a lot before starting work.

Maybe Haydn could tie this up better when he releases the next batch of
kits.

Be assured that lots of effort went into keeping the cost reasonable for members and to make a viable kit.


Something more to stare at as well as the temp gauge now.

Stuart
Bonza

Post by Bonza » Sun Jul 15, 2007 9:17 pm

Few posts already.

Must be the rain.

To drive a point home, please use the supplied wire in the kit that comes from the lower sensor screw to fix to car battery negative. It has a ring connector for that purpose that fits the battery post connection. Its what the designer intended! A good clean earth is required.

Stuart
harpo42

Post by harpo42 » Mon Jul 16, 2007 6:13 am

Have edited the photo, sorry :oops:

The led in the dashboard is quite easy as ther is a hole in the cluster immediatly behind. You dont need to take of the bezel just drill (carefully) straight through from the back. I used the nice sharp drill that came with the kit and then carefully opened it out to the correct size from the front.

Re the earth, take on board what you say, never thaught of those problems. It doesnt quite show in the picture but in the next hole down on the bracket I have the earth for the LB so I think it should be ok. Am I right in thinking that a loss of earth will provide the unit to alarm?

Thanks again for all the work :D
User avatar
mikeonb4c
Supreme Being
Posts: 22877
Joined: Sun Nov 05, 2006 10:49 pm
Location: Living with Mango Bongo in the North West but with a tendency to roam
Contact:

Post by mikeonb4c » Mon Jul 16, 2007 12:25 pm

Harpo42 - what a great installation. I'd like to do mine similarly.

You say:
I wanted to fit it so that it was live on the ingition not as suggestd on the acc switch. I also routed the sender wire through the grommet on the passenger side so that the wire ran inside the car not under the bonnet. Additionaly i wanted to fit the led in the dashboard
Could I ask what made you want to have the unit live on the ignition, as I'm not clever enough to work it out :oops:

I'd like to fit the LED in the dash like you. What a great idea. Would you be able to advise on how I remove the instrument panel to do that. Is it reasonably safe/simple for a relative beginner? Also, you mention you didnt push the LED home too hard. Is there a risk it will work loose and drop out of its locating hole? Would it be practical to fit small connectors (bullet type?) to the wires so it could be moutned more solidly? Do LEDs ever 'blow' and need replacing?

Mike 8)
smartmonkey

Post by smartmonkey » Mon Jul 16, 2007 1:00 pm

Dash removal is about 1 minute. 4 screws for the trim and a few more for the instument cluster. The cluster has 2 multi plugs that need undoing before you can pull it all the way out. Use a good phillips No 2 screwdriver so you don't mark or burr the screw heads. Take care putting the plugs back on.

LED's last for thousands of hours and are resistant to modest heat and vibration. They are polarity sensitive so if you cut the wires to fit connectors you will need to make sure the + and - are correct.
User avatar
mikeonb4c
Supreme Being
Posts: 22877
Joined: Sun Nov 05, 2006 10:49 pm
Location: Living with Mango Bongo in the North West but with a tendency to roam
Contact:

Post by mikeonb4c » Mon Jul 16, 2007 1:04 pm

Thanks++ SM. out of interest, why do you think harpo has opted for a live connection in his system? 8)
Bonza

Post by Bonza » Mon Jul 16, 2007 1:48 pm

Hi Harpo,

Been thinking about your installation.

The way you have it wired into the ignition rather than thru the ACC position is interesting. Do you get the 1 second beep/flash
on turn on?
Is that beep masked by the starter noise? The idea of going thru the ACC position was that you close the door
(no Bongo beeps), turn the key to ACC, get a flash and 1 second beep (system working), then start the engine.

Just watch what the sequence for startup in a Bongo really is .It isnt user friendly.

1. Key in, whats that bloody noise. Close door noise stops.
2. Turn key to ACC position. Jeez, lots of red lights, some go out whatever they were about.
3. Curious amber light. Blimey its a diesel. Bugger, forgot to wait till that lights out, smoky old van init!
4. Engine nicely rattling away, great. Bugger, some of those pesky lights still on
5. 2 lights just went out, something about oil and roof!!!
6. Still got two on, ah, belts. put belt on.
7. Brake, yep, nearly there. Were off!!!

I did hear the beep and see the coolant light in all that , didnt I?? Because in your setup you will have to catch a sight of the flash to ensure its ok. Hearing the beep over the starter noise will be interesting.

Also in your set up you have to see the light go out on start up along with all the other warnings. In mine its a good clean test
before the I start then if it comes on or doesnt stop beeping/ light on steady I dont start or I shut down.
Different approach.

The red wire with a black and white stripe is the negative earth wire. The red is 12v.

Stuart
Bonza

Post by Bonza » Mon Jul 16, 2007 5:05 pm

I asked the EngineSaver designer in Oz about the earthing of the lower sensor screw to the battery or the vehicle frame. Here is his reply-

"Our "normal" Engine Savers use the coolant earth return exclusively.
They however have a very short run on most vehicles.

The 'Bongo Saver" as supplied is the ideal setup for the Bongo with its long hose run to the header tank.
The earth return path is very closely defined, and absolutely NO CURRENT at all passes through the
vehicles system, ie radiator or block or head.
Not a big deal I will grant seeing as we only use 40 odd microamps anyway.
BUT, it gives total control of our operation environment and absolute consistency.
A dirty cooling system with bad earths may not be so kind to us.

So my advice is stick to the installation instructions as devised by Yourself and Haydn.
The bottom probe can be earthed on the body or chassis with no problems, just use it to ensure consistent results across all installations."

So Harpo, using your pick up point as the leisure battery to frame point looks good to me.

A failure in the earthing side of the coolant tank may give erroneous warnings but a failure of the earthing at the module will give no test or warning of coolant loss. So ensure all earths are satisfactory. Running the sensor wire directly to a battery ensures this and is fool proof. An easily detected self test on startup completes the picture as far as the module wiring is concerned.

Stuart
harpo42

Post by harpo42 » Tue Jul 17, 2007 7:54 am

Could I ask what made you want to have the unit live on the ignition, as I'm not clever enough to work it out
Think I may have explained it badly. The Acc is the first section on the turn of the key, what I call the Ign is the second section of the key.
I have disconected the beeps for the key in (first job ever done on).

Felt it was better this way as when camping usually leave the keys in turned to acc otherwise the radio doesnt work, so it would be possable not to see a test when starting the engine. Plus to my way of thinking I liked the idea of it only ever working when the engine was running.

The unit works fine. It gives a testing beep as soon as you go to start the engine, it then gives another test beep as soon as the key is released from the starting position.

The led is so bright its very difficult to miss when it lights up.
It great to have another beeping thing in the van :P When installing it I reversed a couple of feet with the roof up and the coolant detector sensor wire disconnected . I nearly went deaf :shock:

When drilling through the dashbord be very carefull when opening up the pilot hole. As the material is soft there is a tendancy for the drill bit to grab and force its way through rather than cut. Use a slow speed and light pressure and you should have no problems.
Bonza

Post by Bonza » Tue Jul 17, 2007 9:19 am

Thanks for the feedback Harpo,great help. You'd be surprised how even 2 blokes working on it can miss the obvious. I really like your LED position but I wrote it up so that it was easy to fit and felt simple for anyone to do with confidence that buggering it up wouldn't cost the earth.

I was involved in flight deck design trillion years ago so spent more time looking at the egonomics than designing the hardware. We learnt a lot in those days. Luckily, like the British aircraft industry in those days we didnt actually build anything for real.

Sorry to harp on about the earthing but someone is going to notice one point that seems redundant. The designer has spent a long time getting a system that is reliable for all conditions.

My offer still stands for anyone who wants a bit of an old coolant tank to try the drilling a hole bit. Just PM me here. But its really easy so don't worry.

Any feed back just PM me here or PM Haydn Callow. All comments welcome. Any problems Haydn and I can get or give you the answers and assure peeps. Any tips will then be published on the Bongo BB.

Stuart
RobnKathryn

Post by RobnKathryn » Tue Jul 17, 2007 12:37 pm

Hi

I fitted mine ....works great.....installation straightforward and easy...it took me 1 hour last night to fit the LED as per Harpo's method, and another hour this morning to fit the rest.

I'd just like to add a note to reinforce Harpo's comments about drilling the dash; I drilled through from the rear using the 3mm bit supplied, then used an intermediate size from the front before finishing of with 1/4 inch bit. Make sure your drill bits are new and sharp and use very light pressure because as Harpo says, the material is brittle and splintery.

Unlike Harpo I decided to use the 'low water' sticker on the dash face, even though the hole cut was good and clean. I like it with the sticker!

There's a few pics below so you can see which hole to enter from the back of the dash. Once the module is cable tied in place with plenty of slack on the LED wire, there's no strain on the LED so shouldn't slip out as it fits in nice and firmly.

Thanks due to Haydn, Stuart and Harpo!

Image


Image
User avatar
haydn callow
Supreme Being
Posts: 5777
Joined: Mon Jan 08, 2007 9:50 pm
Location: Somerset
Contact:

Post by haydn callow » Thu Jul 19, 2007 11:36 pm

Well I'm back from my short break. Well done to those who have fitted their alarms. Really like the idea of putting the LED by the temp gauge.
Will take all feedback on board and make any mods at a later date.
It may seem expensive at first sight but in fact no profit has been made at this price. I will have to sell 40 kits at this price to recover just my costs to date. Our (the main man) in Oz is also passing on the kits at very reduced prices. The little black module contains a very clever bit of electricky which has taken a long time to develope.
The price they are now available at, from bongo towers, is more relistic.
Do not be tempted to do without the lower sensor. The alarm will work without it but it would be dependant upon the whole cooling system to act as a earth return. Weak or dirty coolant could cause problems. Earth the lower probe/sensor to your battery negative or to a really good clean bit of bodywork.
http://www.coolantalarm.co.uk
Developer of the Mazda Bongo Coolant loss Alarm
Also BMW Clocks
Locked

Return to “Techie Stuff”