Page 1 of 3
DIY Replacement Flooring Progress
Posted: Thu Aug 11, 2016 8:56 pm
by sotal
I've bitten the bullet and made a start at the flooring.
By this I mean I've ripped everything out.
My plan is to board it out with 12mm ply and put Altro over the top.
Bad news so far is that I have found a few small patches of rust. Fairly symmetrical 2 patches on each side. One of them at the rear nearside is worse than the others and quite a hole. It can't be seen from underneath as it is over the rear crossmember but that looks like it has some corrosion underneath the underseal. (It was only MOT'd in July). I have applied rust eater to the rust.
So three main questions so far.
1. Should I get the rusty areas welded up whilst everything is out - or just patch them up with rust eater and paint?
2. Should I cut the seat runners down? There look to be plenty of bolts at the rear so it should still be held in well. Just thinking if I got rid of the front part of the nearside seat runner then the floor would be flatter and neater and easier to clean. (The offside one doesn't really matter and I'd probably leave it as it is under the kitchen unit. Any problems anyone can see with cutting it down?
3. The guide on here suggests screwing the floor down. What do you screw it down to? Also it says to stick the blocks down with sikaflex - so does the underlay go over the blocks, or should it go under them?
I'll post the photos in a minute.
Re: DIY Replacement Flooring Progress
Posted: Thu Aug 11, 2016 8:58 pm
by sotal
Re: DIY Replacement Flooring Progress
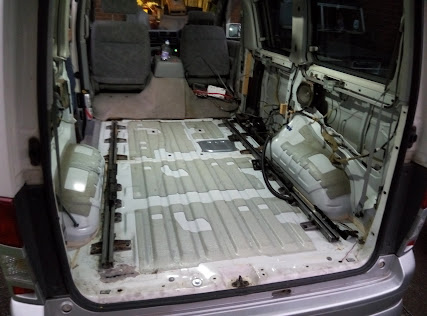
Posted: Thu Aug 11, 2016 9:01 pm
by sotal
This is the worst patch of rust at the rear nearside. It is in two patches but the longer patch is obviously worse. This was just after treating with the rust eater.

Re: DIY Replacement Flooring Progress
Posted: Thu Aug 11, 2016 10:25 pm
by sotal
Found another hole.
We had the rear arches replaced a few months ago. Just beyond one of the arches underneath - it has rusted through. With the interior panel off if you follow your hand along the curve of the arch to the bottom, this is where there is a hole. You can see it from underneath close to where the bumper mounts on.
Is this one that needs sorting sooner rather than later too?
Thanks
Re: DIY Replacement Flooring Progress
Posted: Thu Aug 11, 2016 10:28 pm
by kloonsy
As its so small and contained I would seam seal those two areas then waxoyl the rear crossmember
Re: DIY Replacement Flooring Progress
Posted: Thu Aug 11, 2016 10:29 pm
by kloonsy
post a pic of the new hole!
Re: DIY Replacement Flooring Progress
Posted: Thu Aug 11, 2016 10:48 pm
by sotal
Thanks for the reply, I can't get a shot of the new hole in the dark.
Awkward to do from above too. It is about 2 inches long and less than an inch wide.
Can try and get a picture tomorrow but it is a hole straight through, I can see the torch shining through!
Re: DIY Replacement Flooring Progress
Posted: Fri Aug 12, 2016 8:21 am
by mikeonb4c
If you can find an agreeable welder, it should cost peanuts to get a patch welded on there and it would restore floor integrity and give peace of mind. Have you explored underneath, including up behind the rear silencer heat shield, to ensure there's no rusting in that area that could have been the primary cause. I had to have some expensive welding done around that area last year, and then inner arch work done this year.
Re: DIY Replacement Flooring Progress
Posted: Fri Aug 12, 2016 8:35 am
by sotal
mikeonb4c wrote:If you can find an agreeable welder, it should cost peanuts to get a patch welded on there and it would restore floor integrity and give peace of mind. Have you explored underneath, including up behind the rear silencer heat shield, to ensure there's no rusting in that area that could have been the primary cause. I had to have some expensive welding done around that area last year, and then inner arch work done this year.
Yes I've had a look underneath it is right above the rear silencer. The front face of the rear crossmember just above is blistering a little - That hole of rust in the boot is directly above this blistering.
So I'm guessing the two are related.
Re: DIY Replacement Flooring Progress
Posted: Fri Aug 12, 2016 8:52 am
by mikeonb4c
Sounds like water may be getting driven through into the internals of the rear cross member. I'd be inclined to bite the bullet and have a good stabbing session with a sharp screwdriver. I much prefer to spend on quality welding to achieve (as far as possible) a rust free and structurally sound Bongo. I'm finding also that regular inspection, removal of old flaking dinitrol, and touching up with fresh dinitrol (using disposable brushes) is important to do. Mine had expensive dinitrol waxoyling after i bought it but it does eventually debond in high abrasion areas and its bad news if moisture stsys trapped behind it.
Re: DIY Replacement Flooring Progress
Posted: Sat Aug 13, 2016 7:40 am
by sotal
Bought wood, altro and adhesive yesterday.
Booked it in for a little welding on tuesday
Re: DIY Replacement Flooring Progress
Posted: Sun Aug 14, 2016 9:42 pm
by sotal
Cut the plyboard and made the supports for it to sit on. Also cut the seat runner down on the nearside.
Only a test fit so far as it all has to come out again for the welding, but it all feels nice and firm.
Picture of how it looks so far...

Tempted to glue the blocks to the plyboard so they all stay in the correct place, then take the whole lot out together.
Once the floor is welded, it should just be a case of cutting the Altro to size and gluing that down, then refitting the side cards and the kitchen and putting the bench seat back in. Then just little jobs like sorting the step out and the rear trim across the boot.
Think the hardest job left will be getting the Altro trimmed properly.
Re: DIY Replacement Flooring Progress
Posted: Sun Aug 14, 2016 10:01 pm
by Bob
Looks great.

Consider cutting an access trap for the fuel gauge sender.

Re: DIY Replacement Flooring Progress
Posted: Sun Aug 14, 2016 10:04 pm
by sotal
I considered it but then dismissed it. I'd have to find another way!
As the Altro needs gluing down then the access trap would have to go through the Altro too, the panel in the floor is half under the kitchen and half in the main floor so it would look a right mess and would require removal of the kitchen too.
Re: DIY Replacement Flooring Progress
Posted: Sun Aug 14, 2016 10:08 pm
by Bob
No worries, just didn't want you to overlook it.