Page 1 of 2
Swapping internal light fittings around
Posted: Sat Nov 28, 2009 9:39 pm
by hembramacho
Does anyone know if it’s possible to swap the main centre internal light fitting with the rear tailgate one using the same wiring?
The 3 wires for both lights are a different colour. On the centre one they are red with green stripe, blue with red stripe and black, and on the rear tailgate they are white, black and black with grey stripe – sorry pics not very good.

Can anyone see why this isn’t possible if the correct pairing of wires is worked out? Will anything blow?
Also does anyone know an easy way to work out which wires do what on both lights?
Thanks in advance
Andrew
Re: Swapping internal light fittings around
Posted: Sat Nov 28, 2009 10:51 pm
by g8dhe
Yes they can be swapped over, however the colours don't match what are shown in either manual (1995 or 1997) precisely for the LOOM itself rather than what's on the lamp;
The black wire however is always earth on either light fixing,
Normally Blue with a Red stripe is +12 volts on either fixing,
The door switch (sends an earth out) is Red with green stripe for centre light and Silver with Green & red for the rear lamp.
If you have a meter then it would be easiest to double check if the the rear White wire has +12volts on it, or if its the Black with Silver stripe !
I'll have a check in our vehicle tomorrow, its a bit dark and dank at the moment to check

Re: Swapping internal light fittings around
Posted: Sat Nov 28, 2009 11:20 pm
by hembramacho
Thanks for the reply Geoff.
I'll have a go with a meter when I can borrow one off a mate. In the meantime if you have time to check that would be appreciated.
I'm encouraged though that my plan could be possible. As I've removed the roof to install bed boards i have no central light fitting (so bit dark this time of year), but I have a spare rear light fitting, so plan to wire this to the original central light wiring and mount it somewhere(!) in the rear cab. Where - not sure yet, but it will hopefully give me more light in the cab which will also come on when the side sliding door opens.
Andrew
Re: Swapping internal light fittings around
Posted: Sun Nov 29, 2009 12:18 am
by B*Witched Blingo
We have added a bit of a mod for inside rear. Its one of the Head Lights, the one you put on your head with the straps, elastic (LED) that runs on Batteries. We have taken the straps off and this is what we have done
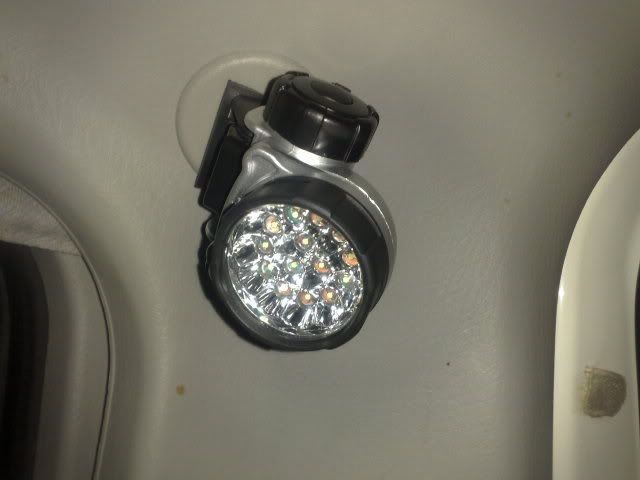
You put this where you need it
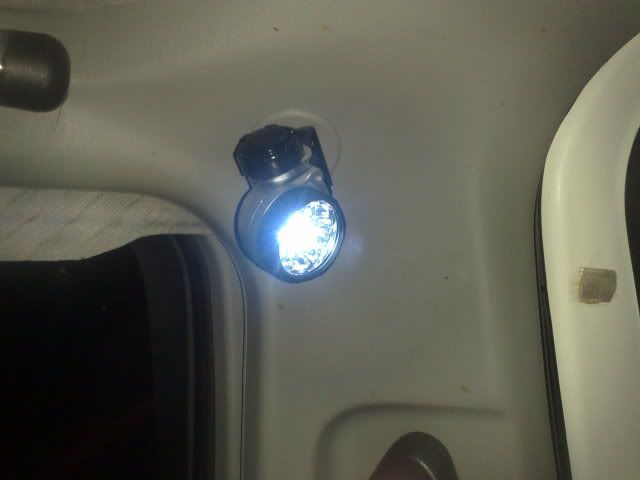
Angle me where you want me and all I need is batteries, rechargeables would be good
No need for wires
Just an option for you to consider.
Good luck

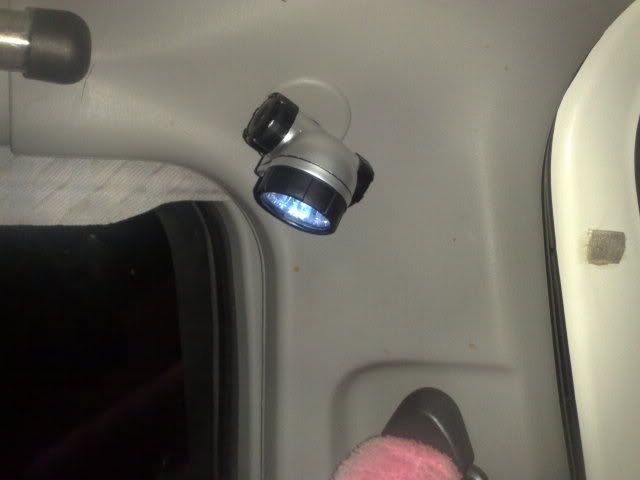
Best of all. It matches the interior a treat.
Re: Swapping internal light fittings around
Posted: Sun Nov 29, 2009 12:45 am
by g8dhe
Ah just spotted I can make out the rear light plug connections in the photo, from which I can work out the wiring in the plug itself, so I have added the sets of arrows to indicate which is which;
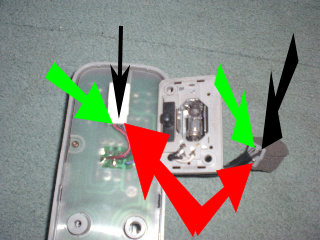
The RED arrows are the +12 volt wire, Black is the Earth wire and the GREEN arrows are the switched earth from the door switch.
Make sure that the Black wire on the Florescent lamp does connect as its normally wired to the chassis of the lamp itself which bolts to the earth in the roof, it is not always connected to the center pin of the plug.
The worst you will do is pop Fuse 1 if its wrong anyway

In fact if you set the lamp switch to ON and connect the Black > Black, and then Blue with Red stripe > White wires the lamp should light (if it doesn't stop), if you only then connect the Green with Red stripe all will be well.
Re: Swapping internal light fittings around
Posted: Sun Nov 29, 2009 10:15 am
by hembramacho
g8dhe wrote:Ah just spotted I can make out the rear light plug connections in the photo, from which I can work out the wiring in the plug itself, so I have added the sets of arrows to indicate which is which;
The RED arrows are the +12 volt wire, Black is the Earth wire and the GREEN arrows are the switched earth from the door switch.
Make sure that the Black wire on the Florescent lamp does connect as its normally wired to the chassis of the lamp itself which bolts to the earth in the roof, it is not always connected to the center pin of the plug.
The worst you will do is pop Fuse 1 if its wrong anyway
In fact if you set the lamp switch to ON and connect the Black > Black, and then Blue with Red stripe > White wires the lamp should light (if it doesn't stop), if you only then connect the Green with Red stripe all will be well.
That's brilliant Geoff - thanks ever so much for that info. Will give it a go when I get the chance.
Andrew
Re: Swapping internal light fittings around
Posted: Sun Nov 29, 2009 11:20 am
by hembramacho
g8dhe wrote:if you set the lamp switch to ON and connect the Black > Black, and then Blue with Red stripe > White wires the lamp should light
Just tried this quickly (as it's raining and we need to go out for the day

) and the light comes on, so my plan should work. As I need to extend the wires from the central light block at the rear to the other light fitting does anyone have any idea what kind of wire (amp wise) I should use?
Andrew
Re: Swapping internal light fittings around
Posted: Sun Nov 29, 2009 1:24 pm
by g8dhe
Ah interesting question, whilst the lamp will only draw about 1 Amp the fuse for the circuit is 10 Amp, I would go for 3x1 metres of 10 Amp cable from the local motor factors the difference in price between that and a lower rated cable will be a couple of pence per metre.
Re: Swapping internal light fittings around
Posted: Sun Nov 29, 2009 7:48 pm
by hembramacho
g8dhe wrote:Ah interesting question, whilst the lamp will only draw about 1 Amp the fuse for the circuit is 10 Amp, I would go for 3x1 metres of 10 Amp cable from the local motor factors the difference in price between that and a lower rated cable will be a couple of pence per metre.
Thanks for that. Another quick question (sorry). Does the thickness of the wire matter at all, or is it just the ampage that's important. I've seen some 10 amp wire at 0.5mm thickness, whereas the original wire on the lights is at least 2mm thick, which seems to be a lot higher ampage than 10amps. Also I'm thinking it might be wise to get some thicker/higher amp wire to use now (would a lot higher ampage than that required matter?) which might come in handy later on when a higher ampage wire may be required on another job!
Andrew
Re: Swapping internal light fittings around
Posted: Sun Nov 29, 2009 8:31 pm
by g8dhe
Well the area of the actual copper
directly affects the current rating or amperage. However there are two types of insulation the older THICK walled softens quicker with increase in temperature and hence for a given overall diameter has a lower rating than the more modern THIN walled wire which is generally to be preferred as it has a higher abrasion resistance and also is harder and hence the temperature it can protect to is higher and hence for a given size can carry more current.
See examples here
Thick walled and here
Thin walled see the Notes at the top of each page.
If youre intending doing other jobs then yes consider getting a thicker wire by all means, but bear in mind that the thicker the wire the more difficult it is to bend round corners and feed thru holes and grommets! I would normally just go by the fuse rating for the circuit involved for normal vehicle wiring - if your doing amplifiers or other non standard devices then there may be other considerations like the overall voltage drop in which case deciding the wire rating isn't quite as simple.
Re: Swapping internal light fittings around
Posted: Sun Nov 29, 2009 8:41 pm
by hembramacho
g8dhe wrote:Well the area of the actual copper
directly affects the current rating or amperage. However there are two types of insulation the older THICK walled softens quicker with increase in temperature and hence for a given overall diameter has a lower rating than the more modern THIN walled wire which is generally to be preferred as it has a higher abrasion resistance and also is harder and hence the temperature it can protect to is higher and hence for a given size can carry more current.
See examples here
Thick walled and here
Thin walled see the Notes at the top of each page.
If youre intending doing other jobs then yes consider getting a thicker wire by all means, but bear in mind that the thicker the wire the more difficult it is to bend round corners and feed thru holes and grommets! I would normally just go by the fuse rating for the circuit involved for normal vehicle wiring - if your doing amplifiers or other non standard devices then there may be other considerations like the overall voltage drop in which case deciding the wire rating isn't quite as simple.
Brilliant - just what I needed to know. Thanks so much for that, and indeed all the info given on this post Geoff.
Andrew
Re: Swapping internal light fittings around
Posted: Mon Nov 30, 2009 9:37 pm
by waycar8
make sure you post a pic of the mod Andy
, I kept my old light to put in the back but havent got round to it yet, you may get me to get my butt in gear and start the to do list thats getting longer

Re: Swapping internal light fittings around
Posted: Mon Nov 30, 2009 9:49 pm
by hembramacho
waycar8 wrote:make sure you post a pic of the mod Andy
, I kept my old light to put in the back but havent got round to it yet, you may get me to get my butt in gear and start the to do list thats getting longer
No worries Wayne. I should get around to it at the weekend. Just trying to decide where to mount the extra light now. I'm thinking of either using the existing hole (adapted to take the more rectangular back of the light fitting) that once housed the seat belt bolt just inside the sliding door on the right. This should be the easiest option as I can hopefully run the wires behind the side panel and screw the light fitting into the plastic. Or I might try and fit it just inside the sliding door on the left (opposite the rear one on the same side) - will have to investigate in the cold light of day(!) the possibilites of where I can run wires so they are hidden and where I can screw the fitting into. I might just wire it up temporarily on a long length of wire and see where gives me the most spread of light.
Andrew
Re: Swapping internal light fittings around
Posted: Sat Dec 05, 2009 8:19 pm
by hembramacho
Wired the light up today (and it works

)and just been out in the dark to decide where the best place to mount it is. Have decided it's going next to the electric roof switch as this is where it gives the best spread of light without being right in your eyes. Need to explore now in the light of day how possible this is and see what's behind the trim, what I can screw into, etc. Have also noticed the back of the light fitting gets really hot (surprise surprise
) so need to consider this also.
Andrew
Re: Swapping internal light fittings around
Posted: Sun Dec 06, 2009 5:37 pm
by hembramacho
Fitted the light fitting today - pretty pleased with the result.


Andrew