You have had a good stab at that, with the clean up, but it is not quite good enough check my post script below. I sort mine way before I got to that stage. But I do have one small patch 2-3 cms at the rear of 1 arch that is not far off. (Albeit buried under multiple
layers of last summers repair.)
Mike's approach is more involved and would look better, of course. Here is the easier quick
but cosmetically inferior approach. It depends if you are bothered about a nice finish or not.
First of all I would try and find out the condition of the inner arches that are parallel to the tyres.
If there are holes in there, well yes then it is a more complicated job and new arches would seem applicable
unless you are talking 1 or 2 1-2cms holes. If not and that area is non holey, apply the same process you have done, sand back and rust convert.
Myself I would have a go as I would not mind holding it back 2/3 maybe more years to save for the arches knowing they are needed
and I would put up with the poor cosmetics. I would also clean behind the arch lip. Thick rubber glove get the crap out. Then a load of sanding behind with wet and dry sandpaper behind and round the lip as much as possible.
Then I would buy a can of POR15 for about £55.00 and put that absolutely everywhere it can be after a thorough sanding and rust converting. 2 coats of POR15 maybe 3. Then hammerite top coat (or correct Bongo colour paint) x 2 then painted on layer of waxoyl over that. As long as you get POR15 really, really worked into inside lip and outside, really get it everywhere it needs to be it it dries like hard rock, seriously tough finish.
The trick is time. Time to make sure that you really get all that can be accessed down to bare metal as far as is possible, really try and
dig into the pitted areas and wire brush/sand it as far as possible. The more you spend time on that the longer it will stay away and avoid the creep.
Then POR15 the **** out of it.
TBH I am not sure I would even fill the holes if you are not bothered about the cosmetics. I would POR15 them first to the max, and decide if you want to fill the holes later. Act immediately. That POR15 must not be on hands/eyes etc. I have never seen any paint dry like it did. You could kind of smack it with a hammer and it would not budge. It somehow molecularly bonds to the metal/rust. Here is some info:
https://www.por15.com/POR-15-Technical- ... ep_62.html
https://www.ebay.co.uk/itm/POR15-Rust-P ... SwdWBXOzkT
It says:
"Metal surfaces should be treated first with POR15 Cleaner Degreaser, then use POR-15 Metal Prep to dissolve rust, etch the metal and leave a Zinc Phosphate for better adhesion of the paint. Use the POR-15 Solvent to thin (if required) and to clean brushes. "
I did not use all those priming products and it has been 3 years where I had a small weld on a cill and a small body work patch. No rust back yet
and the Bongo sits on the street. I just sanded/brushed/rust converted POR15 x 2 coats, then top coats with whatever you fancy.
So you have some options, depending on time/budget/requirements.
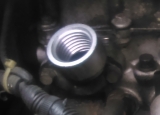
PS Picture 4 dead centre, (where the little mountain peak is

) you missed a flake at the edge you need to sort of it will defnitely creep, screw driver that flake off and there will rust under, sand. Sort the front edge corner still looks rusty to me, have to grind it all off, if you go over existing creeping rust under paint it will be back pretty quick. These details are the difference between a year or so of hold back or 3 or 4 IMO.
Good luck with it all.
They call me light foot.