


The time has come for me to undertake the inner roof reversal, but I've hit the first hurdle (one that doesn't seem to have been reported yet).
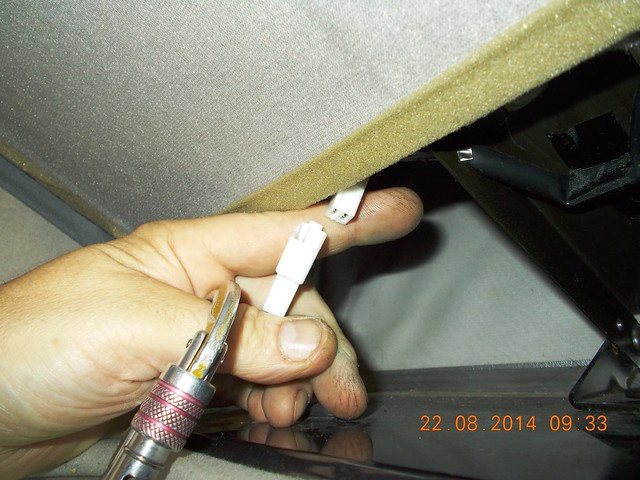
The cable for the light runs from the metal roof to a plug/socket. This from the socket, it runs through the inner roof hinge (a u section with insufficient clearance to pull the plug through) and into the inner roof. This means that I can't simply undo the plug connector and hinge/hydraulic bolts to remove the roof. It seems I'll either have to cut the cables and solder them back together when the reversal is complete, or possibly disconnect them at the light end.
The second issue is I can't establish how to remove the light without forcing (to the breaking point) the clear plastic cover.
Is this an issue other have come across? The other threads on roof mods just seem to suggest that it's a simple case of undoing the plug connector to the light.
Alternative Cat Flap. ACF. DO NOT DELETE
Moderator: Doone
Re: Alternative Cat Flap. ACF
Beyond A to B
Re: Alternative Cat Flap. ACF
When I turned my inner roof around I had to cut the wires. The problem is that you have to re-route the wires as they will be coming out of the wrong side when You turn the roof around. I ended up stripping the lining from the sides of the roof and then drilling holes at either end to thread the wires. Its a bit fiddly but worth it.
I dont remember having any problems getting the interior light apart though. I'll check when I go to the van and let you know.
I dont remember having any problems getting the interior light apart though. I'll check when I go to the van and let you know.
-
Purple Pixie

- Bongolier
- Posts: 215
- Joined: Wed Apr 25, 2012 1:51 pm
Alternative Cat Flap. ACF [rotating the hinging roof panels]
Regarding the Alternative Cat Flap (ACF A.C.F.) process I am putting some photos in a Flickr album that should stay around a time
https://www.flickr.com/photos/johnbulla ... 7588048502
The photos are a number of snapshots of todays proceedings.....
My experiences of today are as follows.... (I am calling the big bit that hinges up and down, the floor panel, there is a smaller panel that hinges within the larger floor panel, this I would call the catflap.)
****General
Secure the struts and or the flap when moving the floor panel around otherwise a grab or snag might propel the floor panel into the fabric... bum arse!
So have another pair of eyes looking out for you and helping you when maneuvering the floor panel around as I learn to my cost today when I managed to tear a wee hole in the fabric. Helen fixed these with Tenacious Tape!
If the floor panel is NOT secured it can get out of alignment with respect to the fabric and this can (and did) lead to the fabric getting gouged/dragged/ripped by the roof mechanism (of course you have always pulled in the folds of fabric in before the final shut and lock????)
****Tools
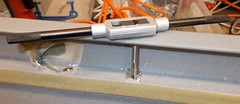
get yourself a thin 12mm spanner to undo the strut bolts retaining nuts, strangely they have 8mm threads whether 12mm or 13mm heads......
**** The catflap
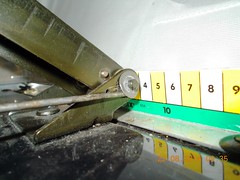
It is held into the floor panel with pop rivets, drill out their centres on the floor side to release the hinges then countersink the remains of the rivets to ensure there are no sharp bits to rip your nightgown! turn it around place it properly and slowly drill new holes for the hinges, re-secure the hinges with pop rivets
*****The BIG Hinges
The BIG hinges pivot on a long clevis pin held in register by a spring washer, you can get this off using a thin screwdriver to invert it and remove it for re-use. Without the retaining washer the pin can be removed releasing 2 plastic spacer washer each side (I'll probably replace the spring washer with a drilled hole and a P clip}
The hinge assemblies are secured to the floor panel by 13mm headed 8mm threaded bolts with washers
The tilting floor panel is made up of pretty high calibre aluminium section - the new mountings for the hinges will either be pre-existing & hidden under the felt/flock covering or I will drill and tap them 8mm (a tap and die set is around £18 from Machine mart)
*** The Gas Struts
Rotating the floor panel means the distance between the ends of the gas struts will change if the existing mounts are used, to correct this you need to either move the mounting brackets on the vehicle roof panel (secured into the metal of the vehicle) or move the mountings on the tilting floor panel.
The forum describes the use of metal plates fastened to the existing body mounts to provide an offset mounting point for the end of the strut... however being in possession of an 8mm tap (a device for threading drilled holes in metal) and a 6.5mm pilot drill I am thinking that modifying the floor panel is best,
I need to drill a 8mm hole in the aluminium section obscuring the location where the existing captive nuts are fitted, this hole will allow me to drill a 6.5mm pilot hole and to then thread it 8mm for the strut ends. the 8mm hole drilled to allow access for the 8mm tap will then be blanked off with a rubber cap. The body then remains virgo intacto. I had thought about an 8mm captive nut on a panel secured by 2 self tappers BUT this was unnecessarily complicated, the tapped hole won.
** Tomorrow -Electrics and new M8 threads for the hinges and strut mounts
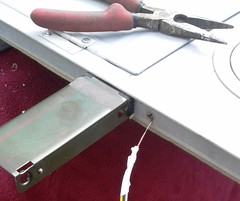
The electrics for the roof light need refitting, I have drilled a hole in the edge of the tilting floor panel to take the longer cable (with a grommet) and intend to pop out the "communication hole" by removing the 4 screws holding it into the frame to allow sight of where the cable to the lights needs routing... dropping it down the turning the panel around by 90 degrees might drop it where I need it!
...the lighting cable is 3 core and easy to source, cutting it at the light end after pulling though the slack gives me a termination for each end.. the connector on the vehicle body is captive .... I may add a duplicated roof release button lower down since we are no fools!
There is a DAB aerial to be installed in the roof but that might be for another day, the Ammeter (Charge Amps to the leisure battery) and Voltmeter (of the same) needs to be replaced with a LCD "charge %" (single gauge) and a 12v cigarette lighter plug socket outlet for the leisure battery is also pushing the aerial install down the list!!!
Helen & Ella are in the New Forest tonight with a hingeless and catflap less Bongo/Freda!
https://www.flickr.com/photos/johnbulla ... 7588048502
The photos are a number of snapshots of todays proceedings.....
My experiences of today are as follows.... (I am calling the big bit that hinges up and down, the floor panel, there is a smaller panel that hinges within the larger floor panel, this I would call the catflap.)
****General
Secure the struts and or the flap when moving the floor panel around otherwise a grab or snag might propel the floor panel into the fabric... bum arse!
So have another pair of eyes looking out for you and helping you when maneuvering the floor panel around as I learn to my cost today when I managed to tear a wee hole in the fabric. Helen fixed these with Tenacious Tape!
If the floor panel is NOT secured it can get out of alignment with respect to the fabric and this can (and did) lead to the fabric getting gouged/dragged/ripped by the roof mechanism (of course you have always pulled in the folds of fabric in before the final shut and lock????)
****Tools
get yourself a thin 12mm spanner to undo the strut bolts retaining nuts, strangely they have 8mm threads whether 12mm or 13mm heads......
**** The catflap
It is held into the floor panel with pop rivets, drill out their centres on the floor side to release the hinges then countersink the remains of the rivets to ensure there are no sharp bits to rip your nightgown! turn it around place it properly and slowly drill new holes for the hinges, re-secure the hinges with pop rivets
*****The BIG Hinges
The BIG hinges pivot on a long clevis pin held in register by a spring washer, you can get this off using a thin screwdriver to invert it and remove it for re-use. Without the retaining washer the pin can be removed releasing 2 plastic spacer washer each side (I'll probably replace the spring washer with a drilled hole and a P clip}
The hinge assemblies are secured to the floor panel by 13mm headed 8mm threaded bolts with washers
The tilting floor panel is made up of pretty high calibre aluminium section - the new mountings for the hinges will either be pre-existing & hidden under the felt/flock covering or I will drill and tap them 8mm (a tap and die set is around £18 from Machine mart)
*** The Gas Struts
Rotating the floor panel means the distance between the ends of the gas struts will change if the existing mounts are used, to correct this you need to either move the mounting brackets on the vehicle roof panel (secured into the metal of the vehicle) or move the mountings on the tilting floor panel.
The forum describes the use of metal plates fastened to the existing body mounts to provide an offset mounting point for the end of the strut... however being in possession of an 8mm tap (a device for threading drilled holes in metal) and a 6.5mm pilot drill I am thinking that modifying the floor panel is best,
I need to drill a 8mm hole in the aluminium section obscuring the location where the existing captive nuts are fitted, this hole will allow me to drill a 6.5mm pilot hole and to then thread it 8mm for the strut ends. the 8mm hole drilled to allow access for the 8mm tap will then be blanked off with a rubber cap. The body then remains virgo intacto. I had thought about an 8mm captive nut on a panel secured by 2 self tappers BUT this was unnecessarily complicated, the tapped hole won.
** Tomorrow -Electrics and new M8 threads for the hinges and strut mounts
The electrics for the roof light need refitting, I have drilled a hole in the edge of the tilting floor panel to take the longer cable (with a grommet) and intend to pop out the "communication hole" by removing the 4 screws holding it into the frame to allow sight of where the cable to the lights needs routing... dropping it down the turning the panel around by 90 degrees might drop it where I need it!
...the lighting cable is 3 core and easy to source, cutting it at the light end after pulling though the slack gives me a termination for each end.. the connector on the vehicle body is captive .... I may add a duplicated roof release button lower down since we are no fools!
There is a DAB aerial to be installed in the roof but that might be for another day, the Ammeter (Charge Amps to the leisure battery) and Voltmeter (of the same) needs to be replaced with a LCD "charge %" (single gauge) and a 12v cigarette lighter plug socket outlet for the leisure battery is also pushing the aerial install down the list!!!
Helen & Ella are in the New Forest tonight with a hingeless and catflap less Bongo/Freda!
--
===========================
1999 Ford Freda - "Purple Pixie"
===========================
1999 Ford Freda - "Purple Pixie"
-
Simon Jones
- Supreme Being
- Posts: 9341
- Joined: Mon Aug 29, 2005 3:34 pm
- Location: Salisbury (ish), Wiltshire
Re: Alternative Cat Flap. ACF
Good write-up. I tried the link but it came up as page not found.
-
Purple Pixie
- Bongolier
- Posts: 215
- Joined: Wed Apr 25, 2012 1:51 pm
Re: Alternative Cat Flap. ACF
working fine for me 20:30 22/08/2015Simon Jones wrote:Good write-up. I tried the link but it came up as page not found.
--
===========================
1999 Ford Freda - "Purple Pixie"
===========================
1999 Ford Freda - "Purple Pixie"
Re: Alternative Cat Flap. ACF
Link not working for me
Gas safe heating engineer / plumber if you need any advice just shout.
-
Purple Pixie
- Bongolier
- Posts: 215
- Joined: Wed Apr 25, 2012 1:51 pm
Re: Alternative Cat Flap. ACF
https://www.flickr.com/gp/johnbullas/2847Ba might be better?Gasy wrote:Link not working for me
Dr B
--
===========================
1999 Ford Freda - "Purple Pixie"
===========================
1999 Ford Freda - "Purple Pixie"
-
Simon Jones
- Supreme Being
- Posts: 9341
- Joined: Mon Aug 29, 2005 3:34 pm
- Location: Salisbury (ish), Wiltshire
Re: Alternative Cat Flap. ACF
Both links now work for me 
-
Purple Pixie
- Bongolier
- Posts: 215
- Joined: Wed Apr 25, 2012 1:51 pm
Re: Alternative Cat Flap. ACF - Part 2 of my photo romance
Got the roof/floor panel refitted, the only issues arising are
(i) with respect to the wiring of the interior light mounted on the underneath of the panel, there are way to many closed compartments to enable the wire to be threaded through the panel when in the reversed position. Helen has kindly agreed for it to be taped down on the top across to the first open channel along the whole length of the panel (to a hole drilled through the trailing edge of the panel).
(ii) I appear to have lost one of the orange spacer washers that sit between the two halves of the hinges to take up the slack!
There was enough space behind the new position of the hinges on the panel to allow for a nut to be used rather than a tapped hole, since these are subject to extension and compression forces during lifting and lowering of the panel - The holes I tapped 8mm for the gas struts for the panel are only subject to side forces rather than any significant forces trying to pull them out, I could go the whole hog and fit a 8mm nutsert/ captive nut but on this basis I think it is overkill (plus the fact there would likely NOT be enough clearance to pull up a nutsert)
Nutserts are threaded pop rivets, 8mm nutserts are a wee bit too big to pick up off the shelf

https://www.flickr.com/photos/johnbulla ... 7588048502 has some updated images
(i) with respect to the wiring of the interior light mounted on the underneath of the panel, there are way to many closed compartments to enable the wire to be threaded through the panel when in the reversed position. Helen has kindly agreed for it to be taped down on the top across to the first open channel along the whole length of the panel (to a hole drilled through the trailing edge of the panel).
(ii) I appear to have lost one of the orange spacer washers that sit between the two halves of the hinges to take up the slack!
There was enough space behind the new position of the hinges on the panel to allow for a nut to be used rather than a tapped hole, since these are subject to extension and compression forces during lifting and lowering of the panel - The holes I tapped 8mm for the gas struts for the panel are only subject to side forces rather than any significant forces trying to pull them out, I could go the whole hog and fit a 8mm nutsert/ captive nut but on this basis I think it is overkill (plus the fact there would likely NOT be enough clearance to pull up a nutsert)
Nutserts are threaded pop rivets, 8mm nutserts are a wee bit too big to pick up off the shelf
https://www.flickr.com/photos/johnbulla ... 7588048502 has some updated images
--
===========================
1999 Ford Freda - "Purple Pixie"
===========================
1999 Ford Freda - "Purple Pixie"
-
Purple Pixie
- Bongolier
- Posts: 215
- Joined: Wed Apr 25, 2012 1:51 pm
Re: Alternative Cat Flap. ACF. DO NOT DELETE
The wiring for the lamp goes straight back down to the original hinge line, how did you re-route it to exit the other side? (can you post me a photo since there seems to be a number or metal flanges in the way......)Extend the wiring of the light, ( soldering iron & heat shrink) re attach the board and all is done
--
===========================
1999 Ford Freda - "Purple Pixie"
===========================
1999 Ford Freda - "Purple Pixie"
Re: Alternative Cat Flap. ACF. DO NOT DELETE
Hi - I really want to do this to my van but don't possess the skills - is there anyone who does this commercially? Or is there a trusted person who would do it for a fee?
I need to be able to get up to my daughter in the night - I've had to stop sleeping in the lid with her as I can't get in or out as she is now too big to move, but on our last camping trip she got tangled in her sleeping bag and got quite distressed (I was verging on it) but fortunately put my arm through the comms hatch and could pull her out - only damage a bruise to my arm!
Thank you!
Vicky
-
Purple Pixie
- Bongolier
- Posts: 215
- Joined: Wed Apr 25, 2012 1:51 pm
Re: Alternative Cat Flap. ACF. DO NOT DELETE
come to southampton and Ill do it
Dr B
Dr B
--
===========================
1999 Ford Freda - "Purple Pixie"
===========================
1999 Ford Freda - "Purple Pixie"
Re: Alternative Cat Flap. ACF. DO NOT DELETE
Really? I'd be happy to pay you!
I could come down any weekend between now and 15th August I think.
If you PM me your number so I can ring you to discuss.
Thank you!
V
I could come down any weekend between now and 15th August I think.
If you PM me your number so I can ring you to discuss.
Thank you!
V
Re: Alternative Cat Flap. ACF. DO NOT DELETE
I did this modification today to turn inner roof round. Took a couple of hours - hardest part was taking roof in and out of van (would have been easier if I wasn't doing it on my own!). I did the following;
1. Removed inner roof by undoing bolts at rear and undoing struts from roof.
2. Removed metal supports at rear.
3. Drilled rivets holding hatch on to roof.
4. Measured and then drilled holes with 6mm bit at other end of roof. Tapped with 8mm tap.
5. Measured and drilled holes for top bolt of struts in roof. Peeled back fabric and cut two slots either side of new bolt hole in outer section of frame to gain access to the inner section which needed drilling and bent tab back. Tapped with 8mm tap. Bent tab up and put fabric back over to cover cuts.
6. Attached metal supports to new bolt holes with nuts on inner section of roof (use pliers to hold in place).
7. Attached top of struts to roof by screwing bolts into threaded holes (did not bother with nuts).
8. Attached bottom of struts to original threaded holes in roof.
9. Put roof down and climbed into roof space to drill new holes for hatch (4mm bit) and riveted hatch to roof (also filled original holes with rivets to tidy them up).
10. I have not attached roof light yet but also drilled holes in either end of the channel in which the top of the driver's side strut sits so can feed wire along this and tape in place.
11. I will screw a small bolt lock to the sunroof hatch to hold the inner roof hatch open.
I was unsure about carrying this out myself but having looked at all the other options I figured this was the best one for us and certainly the cheapest option. Very pleased at how worked out and s lot easier than I had anticipated. Thanks for all the help from various threads on here.
-
Purple Pixie
- Bongolier
- Posts: 215
- Joined: Wed Apr 25, 2012 1:51 pm
Re: Alternative Cat Flap. ACF. DO NOT DELETE
I did the job for the second time last weekend for a fellow Bongonaut
first time was here: https://www.flickr.com/photos/johnbulla ... 7588048502 later photos are from last weekend
All relatively plain sailing, spring washers on the hinge pins a bu**ar like last time
Standing in the hole in the roof panel is best for alignment purposes and pushing the slanted roof forwards into the sleeping space was best gor getting it in/out as less chance of ripping or otherwise damaging the roof lining/fabric
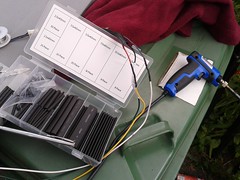
I re-routed the 3 way wiring to enable the light on the bottom face of the roof panel to operate: this need a couple of holes a long rod to clear the way and a bit of twisted welding wire and a good eye to extend the existing wire and thread it through the length of the roof void. Shrink wrapped to perfection!
A few more photos here: https://www.flickr.com/search/?text=maz ... p_rotation
As I am a jack of all trades at present, happy to do the task again for anyone else after some body modification!
Instant message me if you are interested, you must like dogs and be willing to lend a hand as-and-when needed!
Other possible modifications could be to chop the existing roof in half or indeed to produce a roof like a rather robust jacobs-ladder style bed base!
first time was here: https://www.flickr.com/photos/johnbulla ... 7588048502 later photos are from last weekend
All relatively plain sailing, spring washers on the hinge pins a bu**ar like last time
Standing in the hole in the roof panel is best for alignment purposes and pushing the slanted roof forwards into the sleeping space was best gor getting it in/out as less chance of ripping or otherwise damaging the roof lining/fabric
I re-routed the 3 way wiring to enable the light on the bottom face of the roof panel to operate: this need a couple of holes a long rod to clear the way and a bit of twisted welding wire and a good eye to extend the existing wire and thread it through the length of the roof void. Shrink wrapped to perfection!
A few more photos here: https://www.flickr.com/search/?text=maz ... p_rotation
As I am a jack of all trades at present, happy to do the task again for anyone else after some body modification!
Instant message me if you are interested, you must like dogs and be willing to lend a hand as-and-when needed!
Other possible modifications could be to chop the existing roof in half or indeed to produce a roof like a rather robust jacobs-ladder style bed base!
--
===========================
1999 Ford Freda - "Purple Pixie"
===========================
1999 Ford Freda - "Purple Pixie"