


No.1 Exhaust Manifold Stud Repair
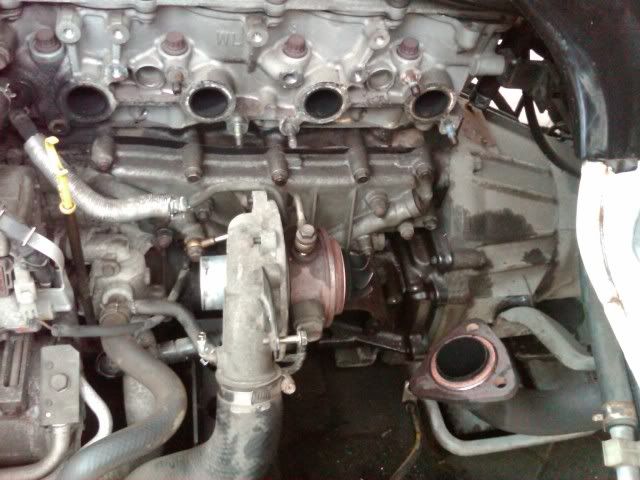
Broken No.1 stud ( the one just outside the turbo heat shield, nearest the alternator)
Symptoms:
.Black Sooty deposits around the Bleed hose pipe and round front passenger side of head.
.Strange Whistle sounds in time with engine revs, usually mistaken for loose drive belts
.Smell of Exhaust fumes in Cabin
.Nut Missing
Tools Required:
A very well stocked Socket Set
6 sided sockets
Exhaust Assembly Paste
Light Emery Cloths
Penetrating Oil (WD40 etc)
3mm Good Quality Tungsten Carbide drill bit or Similar.
Assorted Drills up to 6.8mm
8mm Tapered Tap and Wrench
Cloths
Suitable Aerosol Can Lid
Parts Required:
Exhaust Manifold Gasket mazda part no. MWL0113460 -approx £20+ Vat
6 Nuts (Hot Side) mazda Part No. M9YB100801 – approx £3.34+ Vat each
Mazda Hot Side Studs were approx £4.50+ Vat each. We fit Landrover V8 Metric 8mm Studs Part no. TE108051L £0.39+ Vat each (Cannot Guarantee, but it has done 500 mile no issues)
Repair:
Remove ALL BATTERY CONNECTIONS,
Remove Heat Shield,
Remove flexible U rubber pipe (Air Inlet to Turbo),
Remove large diameter solid plastic pipe that heads towards the rear of the engine to air filter,
Remove Hatch at the rear of the engine to gain access to the EGR Valve area,
Remove large diameter plastic pipe across back of head, towards Air Filter. Watch the connection with the Rocker Cover Breather and Vacuum pipe,
At this point it is advisable to crack the joint of the Exhaust Manifold to EGR 22mm metal pipe as this can be a pig to undo. Leave for a while pre-soaked with WD40 or similar. We had to use 24inch Stiltsons to remove. It was tight,
Losen this joint, but it cannot be removed until the EGR end of this pipe is unbolted (watch the little Tin Gasket at the EGR end),
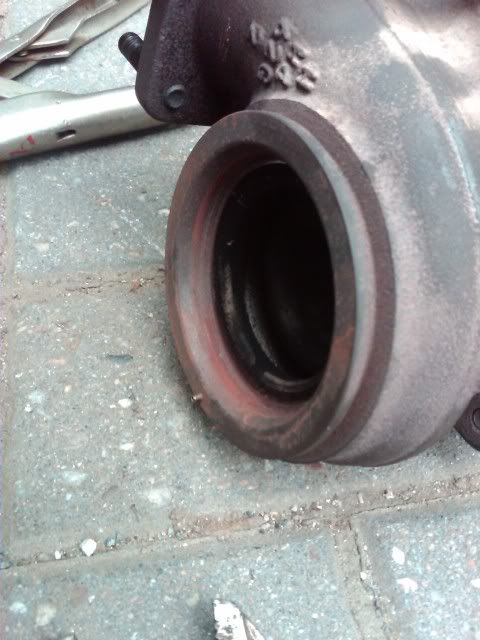
Unbolt the Exhaust (watch the ring gasket. It can be reused if cleaned out and refilled with exhaust jointing paste) and the Exhaust to Engine Mounting,
Remove Turbo to Exhaust Casting and Bracket to Body,
Undo Turbo Mounting Bolts (3 go on way 1 goes the other, watch the Tin Gaskets. These can be reused if cleaned up and look ok),
Loosen Oil Fed Pipe, but leave connected to keep dirt out (watch the copper washer),
Undo the Turbo Clamp that holds the two halves of the Turbo together. The rear end of the Turbo can then come away with the manifold without breaking into the cooling system as there is enough flex on these pipes to move things around,
Cover inlet of Turbo to stop Swarf or Dirt getting into turbo (Use and Aerosol Can Lid. Cheers Kirsty),
Unbolt remaining Manifold Nuts,
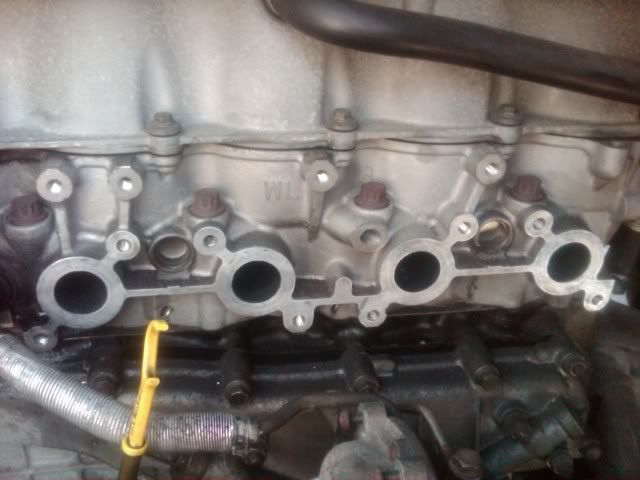
Remove Manifold from Head,
Examine Gasket, Examine Manifold and Examine Head,
Remove all Studs and Examine carefully, (no.8 on mine was also found to be suspect see pics of gasket and studs later),
Clean up Cylinder Head,
Remove Alternator from mounting. No need to remove wiring as it will move out of the way,
Put manifold on the flattest surface you can find. Shine a light under the Manifold to see if you can see the light at any point. You may find that each end (Studs 1 an 8 ) are raised. (Mine needed 2mm out of the middle area to get right by skimming.) See pics later. Head Skimmed at R.M Parker, Precision Engineering, Special one off Tooling, Unit 2, Riverside Mill, Greenfield Road, Colne, Lancashire, BB8 9PE. Tel: 01282 870230 approx £50.00 (depends if he likes you :@))
Now the Tricky Bit
Removing the Broken Stud No.1
I sought advice from all the old boys I could find and the general consensus was if you use a stud extractor you will be LUCKY to get it out. The best way is to Drill and Re-Tap. This is what we did. It is crucial that the first drill is the best you can afford (Tungsten Carbide Tip or similar) We used 3mm TC.
Center Punch 1st. This can be difficult as the Stud may not have broken flat faced. Look at your new stud or the hole next to it for drill depth.
Drill straight down the middle. Take your time with your drill set at its slowest speed. (Get this wrong and you are doomed)
Keep drilling out with various drill sizes to maximum 6.8mm as the Stud diameter is 8mm including thread
Use 8mm Tapered Tap to remove the tail ends of the old Stud threads. Go carefully backwards and forwards cleaning the threads with lubricant as you go.
Make sure everything is clean and reassemble.
Make sure you fit the new Gasket with the Tin Part upwards and the top curling towards you.
4 Points to remember on re-assembly.
1.Make sure you tighten the Manifold to Head Evenly
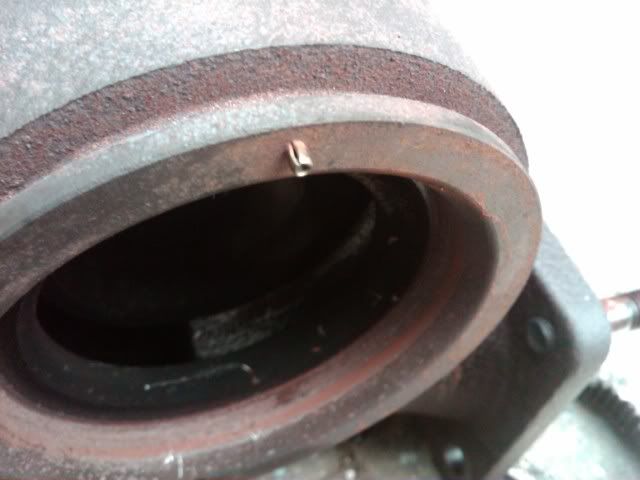
2.Note the soft peg and corresponding hole at the 12 o'clock point (see pics later) in the 2 halves of the Turbo
3.Use Exhaust Assembly Paste to fasten up the EGR pipe to the EGR Valve if this is not blanked off.
4.It was noted that the pipe from the Manifold to the EGR Valve has an OD of 22mm. Can we not blank the EGR Valve off using a standard plumbing copper 22mm blank?
Rebuild using the reverse of the above instructions.
Good Luck.
Repair of Snapped No.1 Exhaust Manifold Stud *DONT DELETE*
Moderators: Doone, westonwarrior
-
Northern Bongolow

- Supreme Being
- Posts: 7713
- Joined: Mon Mar 15, 2010 11:33 pm
- Location: AKA Vanessa
Repair of Snapped No.1 Exhaust Manifold Stud *DONT DELETE*
Last edited by Northern Bongolow on Fri Jun 04, 2010 4:10 am, edited 3 times in total.
-
Northern Bongolow
- Supreme Being
- Posts: 7713
- Joined: Mon Mar 15, 2010 11:33 pm
- Location: AKA Vanessa
Re: Repair of Snapped No.1 Exhaust Manifold Stud
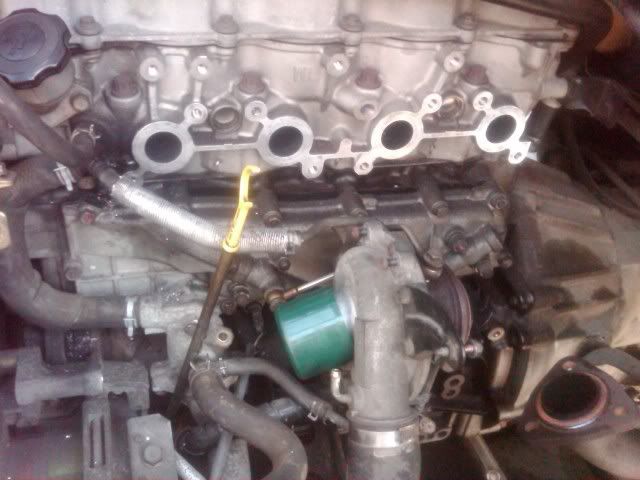
Manifold Ports 1 and 2

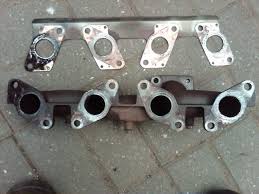
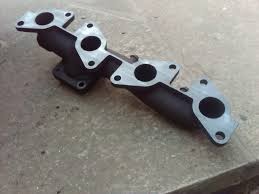
Removed Manifold and Gasket
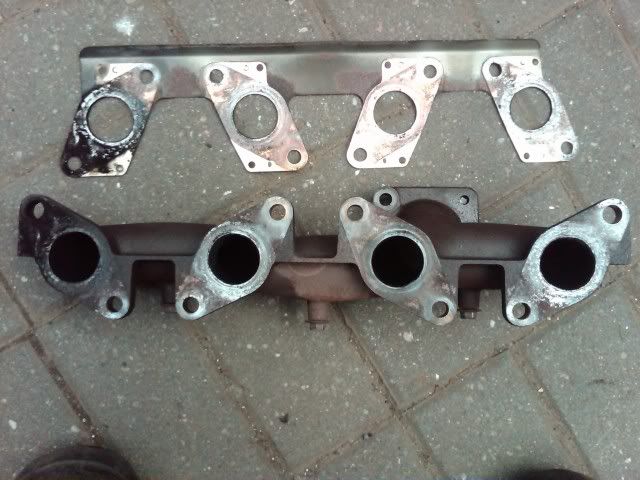
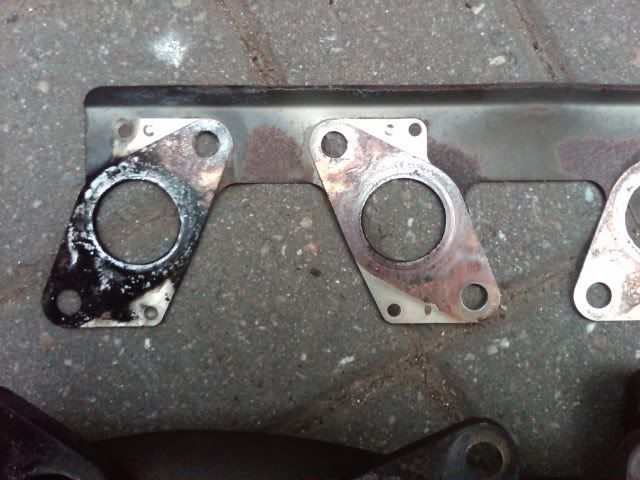
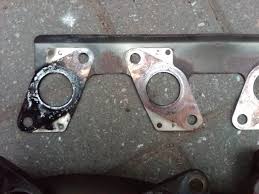
Removed Gasket Port 1 and 2
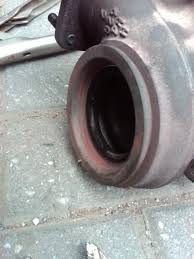
Exhaust Port 1 and 2

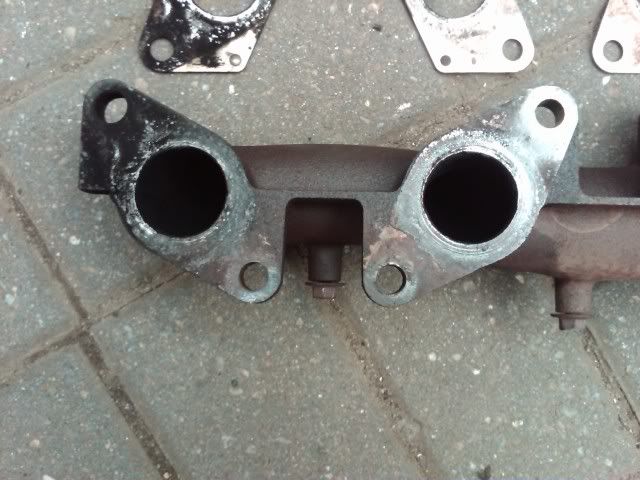
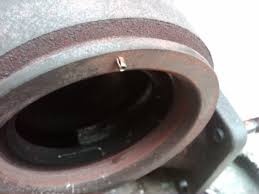
No 1 and 2 Ports, broken stud to the left
Ports 3 and 4

More to come
Removed Manifold and Gasket
Removed Gasket Port 1 and 2
Exhaust Port 1 and 2
No 1 and 2 Ports, broken stud to the left
Ports 3 and 4
More to come
-
Northern Bongolow
- Supreme Being
- Posts: 7713
- Joined: Mon Mar 15, 2010 11:33 pm
- Location: AKA Vanessa
Re: Repair of Snapped No.1 Exhaust Manifold Stud
Turbo Peg Hole

Turbo Peg
Half Turbo Removed
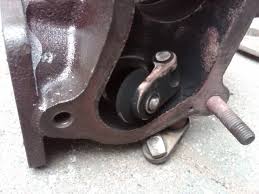
Wastegate

Little Soft Turbo Peg
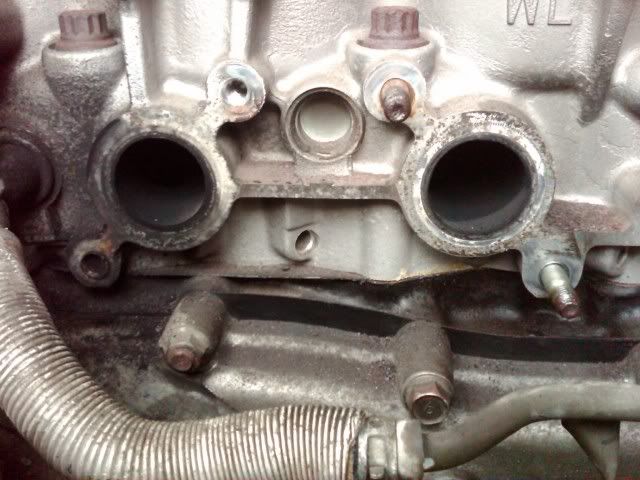
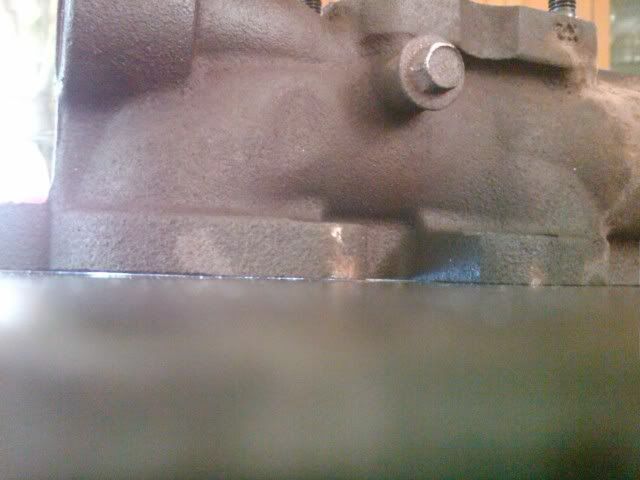
Cleaned Head
Torched Light under Manifold
Day Light Visible
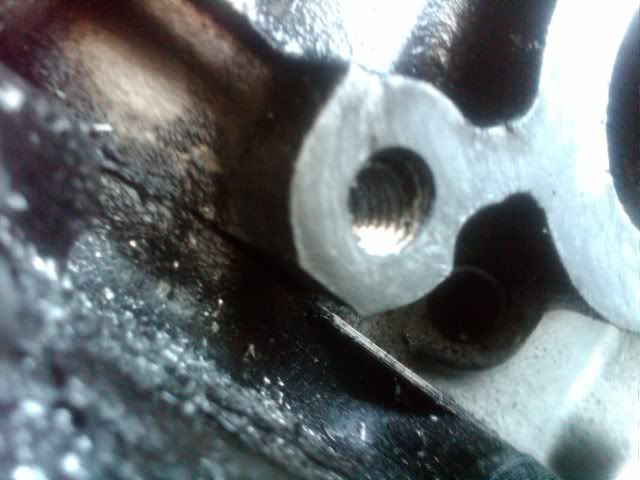
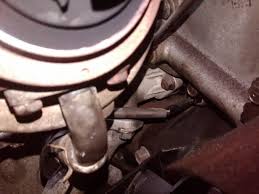
No.1 Stud Drilled and Taped
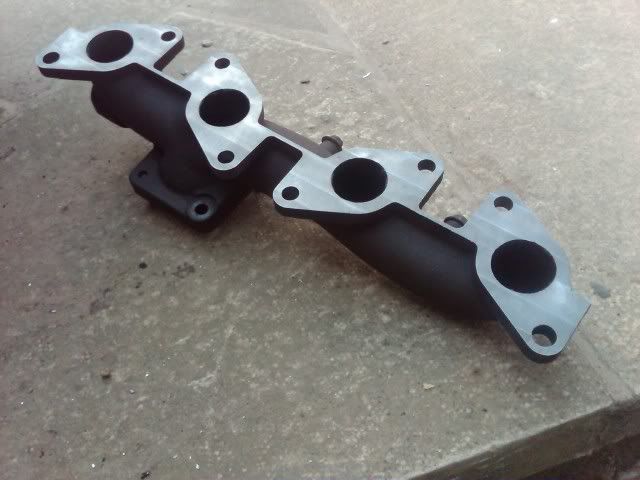
Skimmed Manifold
Ready for Re-Build
Thats it. No More.
Turbo Peg
Half Turbo Removed
Wastegate
Little Soft Turbo Peg
Cleaned Head
Torched Light under Manifold
Day Light Visible
No.1 Stud Drilled and Taped
Skimmed Manifold
Ready for Re-Build
Thats it. No More.

Re: Repair of Snapped No.1 Exhaust Manifold Stud
This is as good as a Haynes and almost makes me feel confident
The user formerly known as csmcqueen 
スコット
スコット
-
mikeonb4c

- Supreme Being
- Posts: 22875
- Joined: Sun Nov 05, 2006 10:49 pm
- Location: Living with Mango Bongo in the North West but with a tendency to roam
- Contact:
Re: Repair of Snapped No.1 Exhaust Manifold Stud
2nd that. This has GOT to be a factsheet. One small thought Ady. Is there any way the manifold could be used as a guide for ensuring the tungsten drill hole is properly centred. It may be necessary to sleeve the manifold as it will be oversize of the stud threading hole but maybe this could be done using a short length of suitable diameter tube, washer or somesuch. Maybe a no go but worth asking in case.csmcqueen wrote:
This is as good as a Haynes and almost makes me feel confident
Great write up
-
dandywarhol

- Supreme Being
- Posts: 5446
- Joined: Mon Dec 19, 2005 10:18 pm
- Location: Edinburgh
Re: Repair of Snapped No.1 Exhaust Manifold Stud
Great description and excellent write up
Another way with dealing with the warped manifold is to dismantle the old manifold gasket by drilling out the rivit and using a couple of the gaskets as "shims" to build up the warp. It works ................
Another way with dealing with the warped manifold is to dismantle the old manifold gasket by drilling out the rivit and using a couple of the gaskets as "shims" to build up the warp. It works ................
Whale oil beef hooked
Renault Lunar Telstar
Yamaha TD1C 250, Merc SLK200, KTM Duke 690
Renault Lunar Telstar
Yamaha TD1C 250, Merc SLK200, KTM Duke 690
-
missfixit70

- Supreme Being
- Posts: 12431
- Joined: Fri Jun 01, 2007 3:53 pm
- Location: weymouth
Re: Repair of Snapped No.1 Exhaust Manifold Stud
Great write up I've emailed Ian the link for use as a factsheet in case he misses it
You can't polish a turd - but you can roll it in glitter.
-
Northern Bongolow
- Supreme Being
- Posts: 7713
- Joined: Mon Mar 15, 2010 11:33 pm
- Location: AKA Vanessa
Re: Repair of Snapped No.1 Exhaust Manifold Stud
mike i looked at the idea of centering the drill bit with some sort of plug,if a plug could be located and made say 30mm long it could act as a jig for the drill bit,and ensure the drill bit was parallel to the stud,but as i had spent nearly 1 full day thinking about the job,and how to best tackle it,enough thought,time to get the job done.plus didnt want to mask the job,wanted to see what was going on.
dandy some one from weymouth tipped me off about that approach,and that some had had success with this,but from the outset we wanted to do a best fix thing,and show how it can be done at reasonable cost.
i must confess that as i am a mono digit trypist i cannott take the credit for the writeup,
chell/she who must be obeyed,is a wizz at this stuff
regards ady.
dandy some one from weymouth tipped me off about that approach,and that some had had success with this,but from the outset we wanted to do a best fix thing,and show how it can be done at reasonable cost.
i must confess that as i am a mono digit trypist
chell/she who must be obeyed,is a wizz at this stuff
regards ady.
-
widdowson2008

- Supreme Being
- Posts: 1703
- Joined: Tue Nov 18, 2008 10:15 pm
- Location: N.E.Derbyshire
Re: Repair of Snapped No.1 Exhaust Manifold Stud
That's upped the standard of fact sheets somewhat 
Excellent job Ady
Brilliant presentation Chell
Excellent job Ady
Brilliant presentation Chell
Steve
-
mikeonb4c
- Supreme Being
- Posts: 22875
- Joined: Sun Nov 05, 2006 10:49 pm
- Location: Living with Mango Bongo in the North West but with a tendency to roam
- Contact:
Re: Repair of Snapped No.1 Exhaust Manifold Stud
I can fully understand that. Definitely worth including the thought in the fact sheet in case others are able to plan and implement when they do theirs. As you say, you only get one chance to drill it on-centre. Scary stuff!Northern Bongolow wrote:mike i looked at the idea of centering the drill bit with some sort of plug,if a plug could be located and made say 30mm long it could act as a jig for the drill bit,and ensure the drill bit was parallel to the stud,but as i had spent nearly 1 full day thinking about the job,and how to best tackle it,enough thought,time to get the job done.plus didnt want to mask the job,wanted to see what was going on.
dandy some one from weymouth tipped me off about that approach,and that some had had success with this,but from the outset we wanted to do a best fix thing,and show how it can be done at reasonable cost.
i must confess that as i am a mono digit trypist
chell/she who must be obeyed,is a wizz at this stuff
regards ady.
Great job well done

Re: Repair of Snapped No.1 Exhaust Manifold Stud *DONT DELET
Northern Bongolow wrote:No.1 Exhaust Manifold Stud Repair
Broken No.1 stud ( the one just outside the turbo heat shield, nearest the alternator)
Symptoms:
.Black Sooty deposits around the Bleed hose pipe and round front passenger side of head.
.Strange Whistle sounds in time with engine revs, usually mistaken for loose drive belts
.Smell of Exhaust fumes in Cabin
.Nut Missing
Tools Required:
A very well stocked Socket Set
6 sided sockets
Exhaust Assembly Paste
Light Emery Cloths
Penetrating Oil (WD40 etc)
3mm Good Quality Tungsten Carbide drill bit or Similar.
Assorted Drills up to 6.8mm
8mm Tapered Tap and Wrench
Cloths
Suitable Aerosol Can Lid
Parts Required:
Exhaust Manifold Gasket mazda part no. MWL0113460 -approx £20+ Vat
6 Nuts (Hot Side) mazda Part No. M9YB100801 – approx £3.34+ Vat each
Mazda Hot Side Studs were approx £4.50+ Vat each. We fit Landrover V8 Metric 8mm Studs Part no. TE108051L £0.39+ Vat each (Cannot Guarantee, but it has done 500 mile no issues)
Repair:
Remove ALL BATTERY CONNECTIONS,
Remove Heat Shield,
Remove flexible U rubber pipe (Air Inlet to Turbo),
Remove large diameter solid plastic pipe that heads towards the rear of the engine to air filter,
Remove Hatch at the rear of the engine to gain access to the EGR Valve area,
Remove large diameter plastic pipe across back of head, towards Air Filter. Watch the connection with the Rocker Cover Breather and Vacuum pipe,
At this point it is advisable to crack the joint of the Exhaust Manifold to EGR 22mm metal pipe as this can be a pig to undo. Leave for a while pre-soaked with WD40 or similar. We had to use 24inch Stiltsons to remove. It was tight,
Losen this joint, but it cannot be removed until the EGR end of this pipe is unbolted (watch the little Tin Gasket at the EGR end),
Unbolt the Exhaust (watch the ring gasket. It can be reused if cleaned out and refilled with exhaust jointing paste) and the Exhaust to Engine Mounting,
Remove Turbo to Exhaust Casting and Bracket to Body,
Undo Turbo Mounting Bolts (3 go on way 1 goes the other, watch the Tin Gaskets. These can be reused if cleaned up and look ok),
Loosen Oil Fed Pipe, but leave connected to keep dirt out (watch the copper washer),
Undo the Turbo Clamp that holds the two halves of the Turbo together. The rear end of the Turbo can then come away with the manifold without breaking into the cooling system as there is enough flex on these pipes to move things around,
Cover inlet of Turbo to stop Swarf or Dirt getting into turbo (Use and Aerosol Can Lid. Cheers Kirsty),
Unbolt remaining Manifold Nuts,
Remove Manifold from Head,
Examine Gasket, Examine Manifold and Examine Head,
Remove all Studs and Examine carefully, (no.8 on mine was also found to be suspect see pics of gasket and studs later),
Clean up Cylinder Head,
Remove Alternator from mounting. No need to remove wiring as it will move out of the way,
Put manifold on the flattest surface you can find. Shine a light under the Manifold to see if you can see the light at any point. You may find that each end (Studs 1 an 8 ) are raised. (Mine needed 2mm out of the middle area to get right by skimming.) See pics later. Head Skimmed at R.M Parker, Precision Engineering, Special one off Tooling, Unit 2, Riverside Mill, Greenfield Road, Colne, Lancashire, BB8 9PE. Tel: 01282 870230 approx £50.00 (depends if he likes you :@))
Now the Tricky Bit
Removing the Broken Stud No.1
I sought advice from all the old boys I could find and the general consensus was if you use a stud extractor you will be LUCKY to get it out. The best way is to Drill and Re-Tap. This is what we did. It is crucial that the first drill is the best you can afford (Tungsten Carbide Tip or similar) We used 3mm TC.
Center Punch 1st. This can be difficult as the Stud may not have broken flat faced. Look at your new stud or the hole next to it for drill depth.
Drill straight down the middle. Take your time with your drill set at its slowest speed. (Get this wrong and you are doomed)
Keep drilling out with various drill sizes to maximum 6.8mm as the Stud diameter is 8mm including thread
Use 8mm Tapered Tap to remove the tail ends of the old Stud threads. Go carefully backwards and forwards cleaning the threads with lubricant as you go.
Make sure everything is clean and reassemble.
Make sure you fit the new Gasket with the Tin Part upwards and the top curling towards you.
4 Points to remember on re-assembly.
1.Make sure you tighten the Manifold to Head Evenly
2.Note the soft peg and corresponding hole at the 12 o'clock point (see pics later) in the 2 halves of the Turbo
3.Use Exhaust Assembly Paste to fasten up the EGR pipe to the EGR Valve if this is not blanked off.
4.It was noted that the pipe from the Manifold to the EGR Valve has an OD of 22mm. Can we not blank the EGR Valve off using a standard plumbing copper 22mm blank?
Rebuild using the reverse of the above instructions.
Good Luck.
Quality Post!
A Bongo is for life, not just for Christmas
-
Mark Norton
- Bongonaut
- Posts: 88
- Joined: Tue Feb 02, 2010 9:04 pm
Re: Repair of Snapped No.1 Exhaust Manifold Stud *DONT DELET
I too shimmed my slightly warped manifold and had no problems, thanks dandywarhol!
I would recommend using a good torque wrench when re-assembling as the studs can strip out of the aluminum cylinder head quite easily if over tightened.
I have heard that thread-lock can cause corrosion in aluminum making the stud more likely to strip out over time. I put the new stud in with a smear of copper-slip.
Not a lot of room to get the drill in, but I did not have any problems "freehand".
-
PixieAndTheMoon

- Supreme Being
- Posts: 1364
- Joined: Fri Sep 05, 2008 11:41 am
- Location: Allithwaite
Re: Repair of Snapped No.1 Exhaust Manifold Stud *DONT DELET
I bet Chell is glad you are her bloke! what wisdom - Wonderful stuff.
Jo
Jo
-
Northern Bongolow
- Supreme Being
- Posts: 7713
- Joined: Mon Mar 15, 2010 11:33 pm
- Location: AKA Vanessa
Re: Repair of Snapped No.1 Exhaust Manifold Stud *DONT DELET
not sure about the first bit jo  . or the wisdom bit either, i just ask the people that know, believe me i spent 2 days looking at that job working it out first before i had the nerve to make a start on it, then i had to get an engineer neighbour to hold my hand whilst doing the job. .
i think the wisdom is knowing when to ask if your not sure, and listen to the right people, luckily there are lots of good people on here with a wealth of knowledge,no one knows it all but together in time we all move forward.
i think the wisdom is knowing when to ask if your not sure, and listen to the right people, luckily there are lots of good people on here with a wealth of knowledge,no one knows it all but together in time we all move forward.
Re: Repair of Snapped No.1 Exhaust Manifold Stud *DONT DELETE*
The original photos were on Photobucket, but I have managed to retrieve them and posted them here.


668. The Neighbour of The Beast.